What have I been working on lately? (4.17.2007)
I've finally finished the embroidery projects of a few weeks ago and am working on some sewing projects!
Pattern Alterations Class: Pants
Last weekend I attended another session in the Pattern Alterations and Adjustments class which began in March. I really wanted to bring something completed to class -- something I had finished using the alterations we made in one of the previous sessions.
So about a week before class, I decided it was time to start the "dirt pants". This was a simple pair of pants which we had made alterations to at the last session. I had purchased a wrinkle-free, polyester linen-look fabric in a nice chocolate brown (actually named "potting soil", hence the name "dirt pants") and all my other notions were on hand, ready to go. I spent a couple of afternoons in early April cutting out my altered pattern pieces, stitching my seams correctly -- there were no front-to-front or back-to-back errors this time around! I even put in an invisible zipper and it looked pretty good. I had a little trouble with the waistband, which was really just a hem with twill tape applied to it. Because the twill tape was more stable than the top edge of the fabric, I kept getting puckers when I tried to top-stitch along the edge. But I managed to get it finished and looking good. I didn't bother with hemming the bottom of the pants, just in case there were corrections to be made at class.
And its a good thing I didn't finish them ahead of time. In my enthusiasm to use all my new machines, I had serged the side seams, but when I tried on the pants in class, this created a bulge on the zipper side. I don't know why I didn't notice that at home . . . also, my invisible zipper wasn't quite right either. So I spent a good deal of time ripping out the serger seam (not fun) and finishing the seam edges with an overedge stitch from my sewing machine and pressing them flat. Then I had to re-stitch a portion of the zipper to make it really invisible. Of course, I ran out of brown thread right in the middle of re-stitching . . . luckily, our class was meeting inside the Jo-Ann ETC, so I was able to quickly buy a new spool of the very same color thread, which just happened to be on sale. Now all I have to do is hem them and my pants will be complete!
In a few weeks (or months) I would like to try to make another pair of pants, but from a different pattern that I will alter all by myself . . . to see if I can do it again.
Pattern Alterations Class: Jacket
I had finished the pants days before class . . . I wanted to try altering a brand new pattern so I could see how well I could make the adjustments on my own and then ask questions during the class. I had a jeans jacket pattern that I have wanted to try since last autumn. I even had the tan corduroy fabric all picked out, pre-washed and ready to go. I started out by choosing my pattern size, making a muslin model of the jacket, but stopping short of finishing the collar and cuffs. The muslin model fit rather well, except for the shoulders, which is always one of my problem areas to fit. It needed to take away a good inch in the shoulder; I marked up one side of the muslin pattern and then ripped out the armhole seam, snipped away the extra fabric and restitched the sleeve to the body, and it looked pretty good. So I proceeded to mark adjustments on my paper pattern and cut out all my corduroy pieces and began assembling the jacket. After several days of work, everything was finished except for the facing and buttons. I had never done a collar or cuffed sleeves before; these look pretty good, considering this was my first attempt.

I was so proud to show off my jacket in class, even if it was a little unfinished and imperfect. And the critique was not too bad -- my adjustment amount was good, but how I applied it could have been done better. I had altered the pattern by taking fabric away at the shoulder which changed the curve of the armhole; I should have altered the pattern by decreasing it in the middle of the yoke and front pieces, to preserve the armhole shape. So that's what I will do on the next jacket. I will finish this one, and I will wear it and keep it as my practice piece.
I have this phrase in mind each time I try some new project or technique: Strive for excellence, not perfection. I like that -- because no person is perfect, and trying to be perfect doesn't allow for variation or improvisation. Lots of times, we learn by making mistakes and fixing them. Striving for excellence, in my opinion, is accepting the challenge to constantly improve and evolve.
More Bags
Since the Mets game was a washout last Sunday I had a free afternoon to stitch.
It was the perfect opportunity to get started on a new bag for Abbey, who is 8 years old and wanted a Vera Bradley style bag. Her mom had seen the Lazy Girl Chelsea backpacks I had made for my nieces and myself and asked me if I would be able to make a bag in time for Abbey's First Communion. Of course I said yes.
I started gathering fabrics and supplies a few weeks ago. The color scheme is pink and orange, something suitable for an 8 year old, but not too pricey and not too juvenile. I found several floral prints, a stripe, and a tie-dyed pink fabric with some orange hues that went together well. At Easter, I showed my swatches to my niece, Jenna (who says she wants to be a designer someday), and she approved of my choices, though she didn't think all the patterns would work all together. And she was right; I had 5 swatches that coordinated with each other, but I didn't really plan to use all five fabrics.
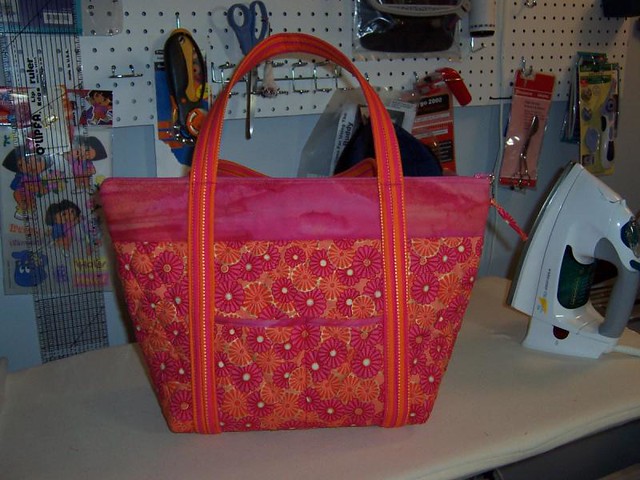
Abbey's mom sent me some information on the type of bag she was asking for . . . similar to a Vera Bradley Villager tote bag. So I went looking for patterns . . . and selected McCall's 4118, view A. The pattern calls for pre-quilted fabrics, but I was using my own fabric choices, so the first step was to quilt the fabric for the various pieces. That's how I spent my rainy Sunday afternoon -- I decided which fabrics would be the inside lining, the outside of the bag, the pockets, the binding, the straps . . . then I measured and cut out pieces of fabric larger than the pattern pieces, to be quilted. And I started the quilting process . . . I am not a quilter, but I can stitch a straight line and make a pretty good diamond shape quilt pattern.
I began assembling the pieces of the tote bag on Monday afternoon, another rainy day. I was supposed to have lunch with my Material Girl friends, but because of the rain and potential flooding, we postponed that a week. So I had another afternoon free for stitching. I always enjoy the part of the project when it starts to actually look like what it is . . . and as the pieces start to take shape and I get nearer to completion, I just want to get the thing done. Today, the bag is about 90% finished. I need to fix a seam that doesn't look quite right and stitch the bottom of the bag and then it should be done. For the most part, I am pleased with the result, but as usual, there are areas I would change to make it look more finished (mostly on the inside), so I will make notes and try to incorporate the improvements next time. I used a high-loft polyester batting when I quilted the fabrics, because I thought that would give the bag a good structure and be washable . . . but I think I added too much bulk, because some of my seams are just too thick. So I need to either use a thinner batting, or trim the batting away from the seams next time . . .
Since the Mets game was a washout last Sunday I had a free afternoon to stitch.
It was the perfect opportunity to get started on a new bag for Abbey, who is 8 years old and wanted a Vera Bradley style bag. Her mom had seen the Lazy Girl Chelsea backpacks I had made for my nieces and myself and asked me if I would be able to make a bag in time for Abbey's First Communion. Of course I said yes.
I started gathering fabrics and supplies a few weeks ago. The color scheme is pink and orange, something suitable for an 8 year old, but not too pricey and not too juvenile. I found several floral prints, a stripe, and a tie-dyed pink fabric with some orange hues that went together well. At Easter, I showed my swatches to my niece, Jenna (who says she wants to be a designer someday), and she approved of my choices, though she didn't think all the patterns would work all together. And she was right; I had 5 swatches that coordinated with each other, but I didn't really plan to use all five fabrics.
Abbey's mom sent me some information on the type of bag she was asking for . . . similar to a Vera Bradley Villager tote bag. So I went looking for patterns . . . and selected McCall's 4118, view A. The pattern calls for pre-quilted fabrics, but I was using my own fabric choices, so the first step was to quilt the fabric for the various pieces. That's how I spent my rainy Sunday afternoon -- I decided which fabrics would be the inside lining, the outside of the bag, the pockets, the binding, the straps . . . then I measured and cut out pieces of fabric larger than the pattern pieces, to be quilted. And I started the quilting process . . . I am not a quilter, but I can stitch a straight line and make a pretty good diamond shape quilt pattern.
I began assembling the pieces of the tote bag on Monday afternoon, another rainy day. I was supposed to have lunch with my Material Girl friends, but because of the rain and potential flooding, we postponed that a week. So I had another afternoon free for stitching. I always enjoy the part of the project when it starts to actually look like what it is . . . and as the pieces start to take shape and I get nearer to completion, I just want to get the thing done. Today, the bag is about 90% finished. I need to fix a seam that doesn't look quite right and stitch the bottom of the bag and then it should be done. For the most part, I am pleased with the result, but as usual, there are areas I would change to make it look more finished (mostly on the inside), so I will make notes and try to incorporate the improvements next time. I used a high-loft polyester batting when I quilted the fabrics, because I thought that would give the bag a good structure and be washable . . . but I think I added too much bulk, because some of my seams are just too thick. So I need to either use a thinner batting, or trim the batting away from the seams next time . . .
Abbey's Tote:
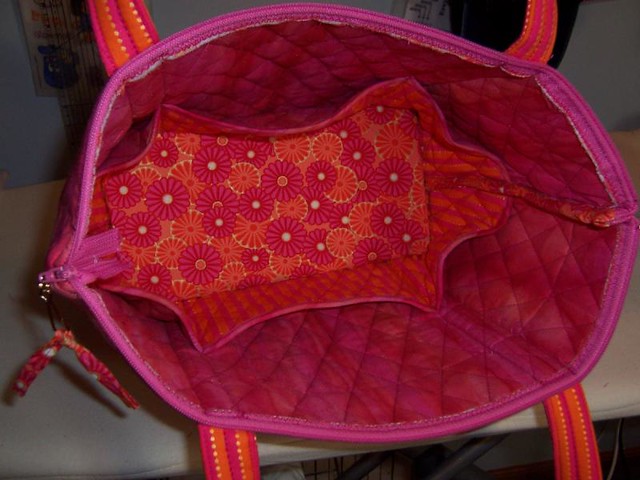
Inside of Abbey's Tote
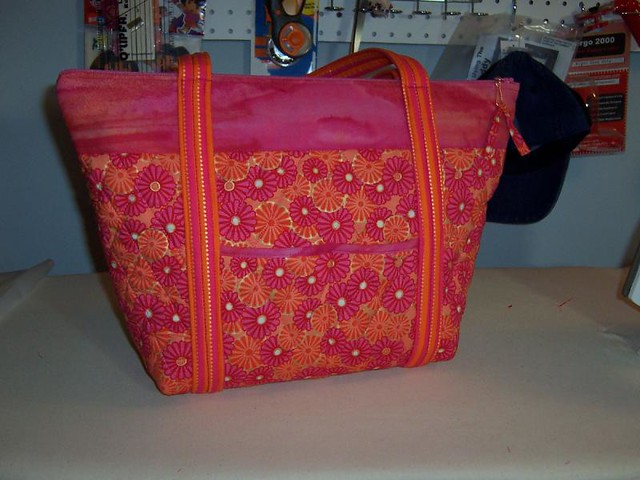
Alternate view of Abbey's Tote
Inside of Abbey's Tote
Alternate view of Abbey's Tote
Now that this bag is done, I would like to make myself a mini travel tote in blue and orange, kind of a small pocket to take my money and ID to the Mets games so I can travel light. I'll write more about that next time . . .


Comments
Post a Comment