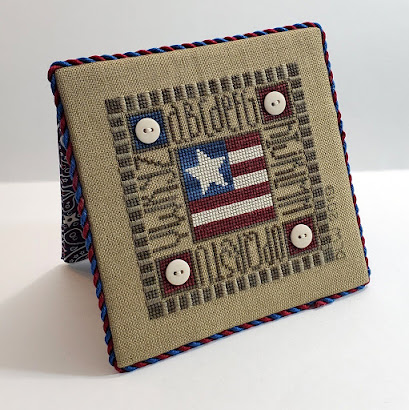
Flatfold Easel Finish: Patriotic Cracker Kit
In my "catching up" post on Needlework Finishes, I included this patriotic mini sampler as one of my in-progress, partially finished pieces. After I began writing those catch-up posts, I felt compelled to finally finish those needlework pieces instead of letting them sit in a box for who knows how long.
Because of my MBC diagnosis and subsequent treatments, I haven't been able to do much at home. Just before my birthday, I decided to stop worrying about what I can't do and spend my time doing something I might enjoy, and the mini sampler flatfold easel was first on my list.
The Patriotic Cracker kit by Bent Creek is a retired design and had been in my stash for years before I stitched it. The name of this design is a bit of a mystery to me - the patriotic theme is obvious, but I think it was called a "cracker" because of the way the kit was packaged. Perhaps it's a play on words for firecracker?
This mini sampler was stitched using hand-dyed cotton floss on linen, and was embellished with buttons provided in the kit. The counted cross stitching was completed in May-June 2019.
Before I could even begin this flatfold easel project, I had to order glue from the local Michaels, because all of my fabric and craft glues were so old they had dried up and were unusable. Thank goodness Michaels had re-opened and offered curbside pickup so I didn't have to wait a week for a delivery!
I followed similar steps as the Home Chilly Home flatfold easel. This patriotic sampler flatfold was a bit easier because it was square.
I cut 2 pieces of stiff cardboard, 2 pieces of mat board and 2 pieces of cotton batting. The cotton batting was glued to the 2 pieces of mat board and trimmed to size after the glue was dry.
The mat board and cardboard were cut 5.5 inches square, which is about 5/8 inch larger than the cross stitch design area on all sizes.
I chose a patriotic paisley fabric backing from my collection of remnants because the colors complemented the design of the needlework. This fabric was used to make lots of pet scrunchie neck ruffles for my SewAmazin shop and I had a remnant piece just large enough to complete this project.
I cut 3 pieces of fabric: 2 pieces were cut 2 inches larger than the cardboard, the third piece was cut about 1.5 inches longer than the others on one side.
The two square pieces of fabric were glued to the 2 pieces of cardboard (left side of photo below). The third piece of fabric was glued to cover the batting side of one of the mat board pieces, leaving the long edge loose (bottom right of photo below).
The mat board piece covered with fabric is the back of the easel; the extra fabric is used as the "hinge" to join the front to the back. A piece of fabric also connects the front to back at the bottom of the easel.
Here are all the pieces just before the final assembly - first row: mat board covered with fabric with hinge at the top (this will be the back of the easel), mat board with batting (this will be the needlework front of the easel), bottom connecting piece; second row: two cardboard pieces covered in fabric.
The needlework was centered on the batting side of the front mat board. The raw edges were glued to the back of the mat board.
The photo below shows the Back piece with the hinge on the left, the Front piece with needlework on the right. The top edge of needlework Front meets the hinge side of the Back.
The hinge part of the fabric is glued to the back of the needlework piece at the top edge; the bottom connecting piece is glued to the back of the needlework piece along the bottom edge.
I neglected to take photos of the next steps. The cardboard pieces were glued to the back of the mat board pieces, sandwiching the bottom piece between the two Back pieces.
The side view of the finished easel helps to illustrate how all the pieces came together.
I made twisted cord using embroidery floss in colors that coordinate with the needlework and the backing fabric and glued it around the front edges, covering the space between the needlework and cardboard back.
This project took about 2 days to complete, mainly because I had to wait for the glue to dry completely in between each step.
Recap of supplies used in this project:
- Completed needlework design, trimmed to size
- 2 pieces of mat board, cut to size
- 2 pieces of stiff cardboard, cut to size
- 2 pieces of cotton batting, cut to size
- cotton backing fabric, remnants
- fabric glue
- embroidery floss
- Twisted Cord Drill
Tutorials I used for reference:
Blog post dated January 2011 with detailed instructions and photos of each step
Blog post dated August 2008 with instructions and photos
See more photos in my Flatfold Easel Finishing for Counted Cross Stitch Google photo album


Your flatfold tutorial turned out beautifully! Thank you for the 'nod' toward my tutorials.
ReplyDelete