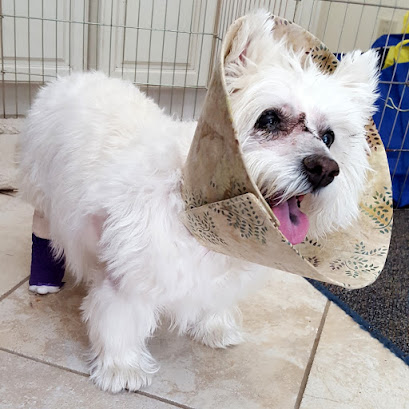
Fabric E-collar for Keli - June 2017
In my recent "catching up" post on Sewing Finishes, I included this Fabric Elizabethan Collar that I made for Keli in June 2017.
Keli had a lump on her nose, right between her eyes since 2015. It became quite large and would bleed frequently, required constant cleaning and became even larger through 2017. I finally convinced my vet to remove it despite her age (15 at the time) because she was in relatively good health and the lump was becoming a quality of life issue for both of us. The lump turned out to be malignant, so I have no regrets for putting her through the surgery.
To keep her comfortable post surgery, I made her a fabric e-collar to replace the plastic one from the vet. She didn't really like either e-collar, but she didn't fuss as much and slept better with the fabric version.
I used the plastic collar from the vet to make a template and constructed the collar with batik fabric and fusible Peltex firm interfacing, with Velcro closures.
The plastic e-collar from the vet is adjustable to fit different size dogs; I used the size that fit Keli so there shouldn't need to be size adjustments.
The plastic e-collar is essentially a half circle. I traced the outline onto Pattern Ease for half of the collar, then divided that into 2 pieces for sewing. I added 1/2 inch seam allowances to the inner and outer circle edges and at the side seams.
This botanical batik fabric was gifted to me; I used it because it was pretty and I thought the beige background wouldn't look too shabby if it got dirty. I cut 2 of each pattern piece for both the inside and outside of the collar. I stitched the pieces with right sides together, then pressed the seams open.
Using the original plastic collar, I traced and cut a single piece of Pellon 2-sided Fusible Peltex, then fused one side to the wrong side of the outside fabric piece.
Next, I stitched the outside to the inside fabric with right sides together, around all edges as close as possible to the edge of the Peltex, leaving the inside circle open. I carefully turned the collar right side out and pressed the stitched edges, making sure both sides were completely fused to the Peltex.
Then I folded the inner neck circle edges to the inside, matching the inside and outside pieces. I used small Wonder Clips instead of pins to secure the pieces together for stitching.
I stitched the inner neck as close to the edge as possible, then stitched again 1/4 inch inside. The last step was to attach the Velcro to opposite sides at each end of the collar. I used a type of Velcro that sticks to itself, which is a little softer and there is no hook or loop side.
When we went back for her first post surgery check-up, our vet and the staff were very impressed with Keli's fabric e-collar! Here she is about 7 weeks later, her incisions were healing well and her fur was growing back nicely.
We've used the e-collar for Penny on occasion, although it's a bit loose on her, I really should add a second strip of Velcro to adjust the size ... but then I'd have to go shopping, because I don't seem to have any more of it!
Recap of supplies and notions for this project:
- Plastic E-collar, adjusted to size
- Pattern Ease tracing material, about 1/2 yard
- Cotton fabric, about 1/2 - 3/4 yard
- Pellon Peltex Ultra Firm Two-Sided Fusible Interfacing, about 1/2 yard
- Iron and heat safe surface (for fusing Peltex)
- Clover Wonder Clips, small
- Velcro strips
- Sewing machine and all-purpose thread, 90 needle, Sharp or Topstitch
This project took the better part of a day to plan, prep and complete.


Comments
Post a Comment