Slipcover Progress: Cushions are Done!
This month's big project is making slipcovers for my old couch and ottoman. The ottoman turned out quite well and has survived several weeks of Westie play- and naptime.
For the sofa, I decided to begin with the cushions for a few reasons:
For the sofa, I decided to begin with the cushions for a few reasons:
- They are portable, so I can carry them upstairs to work on them in my sewing room.
- Most of the piping on the covers is on the cushions, so I can get that task out of the way early.
- I've made cushion covers in the past and feel more confident in putting them together first.
I had some "help" right away:

I want to be able to machine-wash these slipcovers so before cutting out any pieces, I pre-washed and dried my fabric in 5-7 yard sections. While waiting for the pieces to dry, I gathered up some supplies.
For a sewing reference, I use Simplicity's Simply the Best Home Decorating Book, which I've had since about 1995. The cover photos are somewhat dated, and I would guess the book has been updated sometime in the past 15 years. The basic instructions for making everything from window treatments to bedskirts to slipcovers are included in this manual.
For a sewing reference, I use Simplicity's Simply the Best Home Decorating Book, which I've had since about 1995. The cover photos are somewhat dated, and I would guess the book has been updated sometime in the past 15 years. The basic instructions for making everything from window treatments to bedskirts to slipcovers are included in this manual.


A few months ago I ordered 50 yards of cotton piping (a home dec notion) and a Make-A-Zipper roll from Joann.com, during their Merry Moolah sale.
 One of the cuts of fabric was a 2 yard piece, which I used to cut bias strips for making the piping. Each cushion required two lengths of piping at just under 120 inches each; that's 960 inches total or just under 27 yards of piping for the cushions.
I cut the bias strips at 1-1/2 inch width, as I was trying to be frugal; 1-3/4 inches would have been a little easier to work with and I would have had plenty of bias to work with. The bias strips were pieced to make sections a little longer than 120 inches each.
To make the piping, I cut lengths of cotton cord about 120 inches long. I folded the bias strips in half lengthwise and pressed them lightly with iron, then placed a length of cord inside the strip along the fold and pinned the raw edges closed. Then I stitched them closed using a single welt cord foot. This foot has a groove on the bottom that slides along the cord and helps keep everything straight -- a very helpful tool to have when making nearly 30 yards of piping!
 After the piping was finished, I cut out all the pieces for the back cushions. I removed the old cover from one of the cushions and used it as a pattern to trace the cutting line onto my new fabric. Then I cut and pieced together the boxing strip, including a 42 inch zipper section, for each cushion.
To apply the piping, I pinned and then basted it along the edge of each cushion front and back. The single welt cord foot helped out again as I sewed (I adjusted the needle position 1.5 to the right). Last, the boxing strip was attached to each side of the cushion (with the zipper open slightly for turning), still using the single welt cord foot and with the needle position at 1.0. It was a little tricky going around the curves, and I had to rip out and re-stitch a few sections. To join the raw edges of piping, I simply overlapped them at a lower corner and cut away the cording inside. I didn't want to be bothered with making a "pretty" joining since this part of the cushion won't be visible.
It took two days to complete the back cushions:


The seat cushions were next, and I followed the same process, thinking these were going to be much easier, being a simple shape. I cut a rectangle based on my measurements, but I should have traced them for a better fit of the curve of the piping at the corners. As a result, I ended up pin-fitting the pieces to each cushion before sewing them (sorry - forgot to take a photo of that step!) and spent way too much time ripping and re-sewing the corners. Eventually everything worked out and I have a pair of fairly good-looking cushion covers (which also took me about two days to finish):
One of the cuts of fabric was a 2 yard piece, which I used to cut bias strips for making the piping. Each cushion required two lengths of piping at just under 120 inches each; that's 960 inches total or just under 27 yards of piping for the cushions.I cut the bias strips at 1-1/2 inch width, as I was trying to be frugal; 1-3/4 inches would have been a little easier to work with and I would have had plenty of bias to work with. The bias strips were pieced to make sections a little longer than 120 inches each.
To make the piping, I cut lengths of cotton cord about 120 inches long. I folded the bias strips in half lengthwise and pressed them lightly with iron, then placed a length of cord inside the strip along the fold and pinned the raw edges closed. Then I stitched them closed using a single welt cord foot. This foot has a groove on the bottom that slides along the cord and helps keep everything straight -- a very helpful tool to have when making nearly 30 yards of piping!
After the piping was finished, I cut out all the pieces for the back cushions. I removed the old cover from one of the cushions and used it as a pattern to trace the cutting line onto my new fabric. Then I cut and pieced together the boxing strip, including a 42 inch zipper section, for each cushion.To apply the piping, I pinned and then basted it along the edge of each cushion front and back. The single welt cord foot helped out again as I sewed (I adjusted the needle position 1.5 to the right). Last, the boxing strip was attached to each side of the cushion (with the zipper open slightly for turning), still using the single welt cord foot and with the needle position at 1.0. It was a little tricky going around the curves, and I had to rip out and re-stitch a few sections. To join the raw edges of piping, I simply overlapped them at a lower corner and cut away the cording inside. I didn't want to be bothered with making a "pretty" joining since this part of the cushion won't be visible.
It took two days to complete the back cushions:
The seat cushions were next, and I followed the same process, thinking these were going to be much easier, being a simple shape. I cut a rectangle based on my measurements, but I should have traced them for a better fit of the curve of the piping at the corners. As a result, I ended up pin-fitting the pieces to each cushion before sewing them (sorry - forgot to take a photo of that step!) and spent way too much time ripping and re-sewing the corners. Eventually everything worked out and I have a pair of fairly good-looking cushion covers (which also took me about two days to finish):

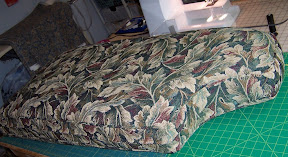
I had some help from Penny with the seat cushions, too -- guess where she's sleeping:

Maybe she's keeping it warm for me while I work:

I still need to serge the seams for a nice clean finish to prevent fraying. I may wait until the very end so I can do all my serging at once.
Next, I'll be starting on the body of the couch slipcover. There's a little bit of piping on the arms, and I'll have to match and piece several widths of fabric together to fit the width of the sofa before pin-fitting any of the pieces. This will be the more challenging part of the project -- not that the cushions were easy.
I'm planning on moving my sewing machine and tools to the dining room for this next phase so I don't have to go up and down the stairs too often. I expect this will take about 2-3 more days, at least.
You can see all the photos from this project in my Slipcovers Picasa photo album.


Nice job. I love the dogs!!!!!!
ReplyDelete