Finished: Metsie T-Shirt Makeovers
I finished these t-shirts just about a month ago, just in time to wear for the last game at Shea. I've kind of been avoiding writing about them, since the Mets are not playing this post-season.
This week I received a letter from the Mets' Ticket Office, offering to keep my post-season deposit towards a ticket plan for 2009 -- yes, apparently they are offering a few partial ticket plans in addition to season tickets next year -- but I chose to receive a refund.
Anyway - to finally close the book on the 2008 season, I'm sharing my re-modeled Mets t-shirts one more time.
By the way, these are not makeovers in a sense that the style or look of the t-shirt has been altered -- I didn't change the shape of the neck or arms or turn them into something other than a t-shirt. I just cut them apart and stitched them back together so that they would fit me.
I should also clarify that I am still somewhat of a beginner at sewing with knits; I've had some success in the past and since these t-shirts didn't fit me before I started hacking at them, I figured I had nothing to lose if they didn't turn out right. The end result is that I have 3 shirts that fit me much better now.
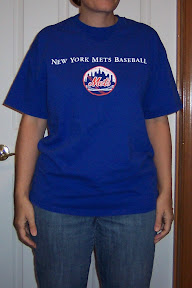
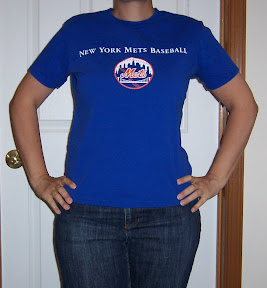
The next shirt was an Adult Large; photo on the left is before, on the right is after:
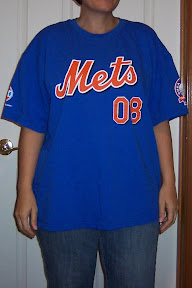
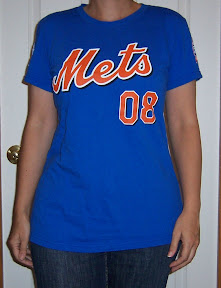
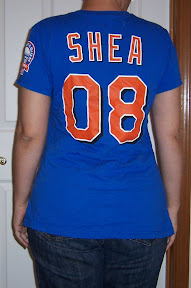
And last but not least, the one I wore to the final game at Shea, which started out as an Adult Extra Large - before:
After:
This week I received a letter from the Mets' Ticket Office, offering to keep my post-season deposit towards a ticket plan for 2009 -- yes, apparently they are offering a few partial ticket plans in addition to season tickets next year -- but I chose to receive a refund.
Anyway - to finally close the book on the 2008 season, I'm sharing my re-modeled Mets t-shirts one more time.
By the way, these are not makeovers in a sense that the style or look of the t-shirt has been altered -- I didn't change the shape of the neck or arms or turn them into something other than a t-shirt. I just cut them apart and stitched them back together so that they would fit me.
I should also clarify that I am still somewhat of a beginner at sewing with knits; I've had some success in the past and since these t-shirts didn't fit me before I started hacking at them, I figured I had nothing to lose if they didn't turn out right. The end result is that I have 3 shirts that fit me much better now.
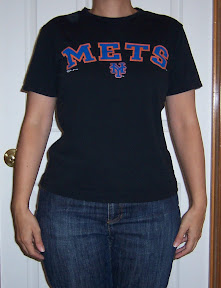
In my previous post, I shared the results of my first attempt at altering a t-shirt that was an Adult Medium. Here's a reminder of how that one turned out, taken after I finished hemming the bottom:
The next shirt was an Adult Large; photo on the left is before, on the right is after:
And last but not least, the one I wore to the final game at Shea, which started out as an Adult Extra Large - before:
After:
I decided not to shorten this one, partly so I wouldn't have to hem it and also because I kind of like it a little bit longer, almost tunic length; I also like it better worn with white jeans
*****************************
Here's how I altered my t-shirts (see the photo album for larger images):
Supplies used:
- Sewing Machine and regular sewing thread to match the shirt
- Serger and woolly nylon thread to match the shirt
- Stay Tape (I used Dritz brand)
- Chalk or other marking pencil/pen
- General sewing supplies: seam ripper, scissors, pins
- Oversized t-shirts (the bigger it is the easier it is to alter)
- Model t-shirt that fits well
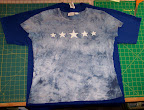 First, I chose a t-shirt I like to wear that fits me well in the shoulder, sleeves, bust, waist and length. In this case I used a t-shirt with stars painted on the front. I pinned the model t-shirt on top of the oversized t-shirt, lining up the star design with the printed Mets logo, matching the center fronts so that the design would be "balanced" on the chest (not too high or too low or off to either side). For the Shea 08 shirt, I did the same thing on the back to make sure it wasn't too high/low or off center; I cut the back and front pieces separately.
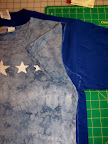 I pinned the shirts together along the shoulders, side seams and armhole seams. I folded the sleeves forward and used marking chalk to trace all around the model t-shirt, along the shoulders, side seams, bottom hem and neckline on the front of the shirt.
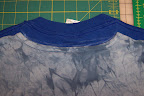 I followed the same procedure for the back of the shirt, lining up the model t-shirt with the front tracings, to draw the back neckline. The traced lines later became my approximate sewing lines.
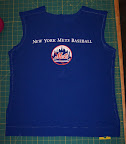 Carefully, I cut about 1/2 to 3/4 inch away from the traced sewing lines, trimming around the sleeves and neckband, but not slicing into them.
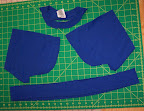 I had some "leftover" pieces which I used later to re-attach the neckband and sleeves. The cut-off section of the hem was used to test the stitching on my machines before sewing the t-shirt pieces together.
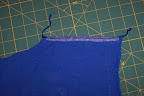 Using my regular sewing machine, I stitched Stay Tape to each back shoulder to help keep it from stretching out of shape. Note - this ended up being a little bit itchy when wearing the t-shirt; I might omit this step or find an alternative way to stabilize the shoulder or cover the stay tape in the future.
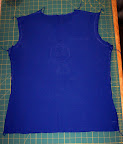 Next, I threaded my serger for a 4-thread overlock stitch using woolly nylon thread and stitched the front to the back at the shoulder and side seams, right sides of the t-shirt facing together. I used the chalk tracings as a guideline for sewing the seams. Note: on one of the t-shirts I didn't have 4 spools of woolly nylon and ended up using a 3-thread overlock stitch, which seems to be okay. Time will tell.
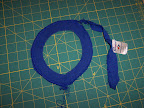 Now it was time to deal with the neckband. The original band was made of a ribbed knit, and still had pieces of the t-shirt attached at the original seam line. Carefully, I used a seam ripper to remove all the threads around the raw edge of the neckband, removing the label and and all remnants of the original shirt. I was left with a circle of ribbing.
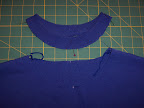 I folded the circle in halves to find the 4 quarters of the neckband and marked them with pins, keeping the original back seam (where the tag used to be) to the back. I did the same for the t-shirt, matching the shoulder seams together to find the center front and back of the neck. With the right sides facing each other, I matched the pin markings in the neckband to the new shoulder seams and marked centers and pinned all around, easing in the fullness where necessary.
 I used the serger to sew the neckband back onto the shirt. The two knits are very forgiving, so I stretched them as I serged to ease in fullness. Note: before serging, I adjusted the knife on the machine so that it was not cutting or trimming any fabric, just overlocking along the edges.
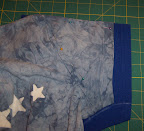 Next, I needed to adjust the sleeves. I didn't want to have to hem them, so I lined up the top of the model t-shirt sleeve with the top of the makeover shirt and traced the armhole seam and bottom of the sleeve, leaving the sleeve length and hemmed edges intact.
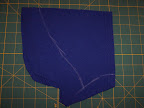 I cut out the first sleeve near the tracing lines and then used it as a
  pattern to cut out the other sleeve in a mirror image, marking which was the left and and right so I could re-attach them properly. I serged the bottom edges of each sleeve, being careful to line up the hemmed edges evenly.
Similar to steps for reattaching the neckband, I matched the side seams of the t-shirt to the bottom seams of the sleeves and the shoulder seams of the t-shirt to the top of each sleeve and pinned them together, easing in the fullness where necessary. I used the serger to sew them together (without trimming).
The last step (which I forgot to photograph) is to hem the bottom edge, if necessary. My serger converts to do a coverstitch, so that's what I used. I tried to use the special foot attachment for hemming while doing a wide coverstitch, but the t-shirt kept slipping out of the guide on the foot after a few inches. So, instead I just folded up and pinned the hem and coverstitched all the way around, making sure the raw edge of the t-shirt was covered by the bottom threads. If you don't have a coverstitch machine, a double needle on a regular machine should do the same. I also found that regular serger thread or sewing thread worked better for me than woolly nylon did for the coverstitch. But I practiced a *lot* on the t-shirt scraps before hemming my finished shirts.
Well, that's it -- I'm pretty pleased with how the t-shirts turned out. They fit my shoulders and arms much better now, and they survived both the washer and dryer without coming apart or any other misadventure.
There is still one shirt I have not attempted to remodel, mainly because there are some holes in it and I'm considering making it a doggie t-shirt or something else. And since finishing these short-sleeved makeovers, I've found a long-sleeve t-shirt from 2007 that is way too big for me to wear. I don't know yet if I'll try to re-size it as a short-sleeve shirt or keep it with long sleeves.
But that's a project for another day.
*****************************
While drafting this post, I discovered a few other T-Shirt Makeover links that might be helpful:- How to Restyle a T-Shirt into a Gathered-Yoke Top >> CraftStylish.com
- How to Sew a Classic T-Shirt Neckband >> CraftStylish.com
- How to Restyle a T-Shirt with Pin Tucks >> CraftStylish.com
- Materni-T Makeover >> Bernina Blog
edited:
Nov-15-2018 replace links to old Picasa album with Google photo album, remove old bad links


Comments
Post a Comment