Reusable Grocery Bags: How To Make
In August I wrote a little bit about my ideas for making reusable grocery/shopping bags (August Odds & Ends) to replace my old purchased fabric grocery bags. Since then, I've made more than 20 bags from fabric remnants -- all green!
This project began because I needed to clear out some space in my sewing room. I had a *lot* of home dec fabric remnants in 1-3 yard pieces that were taking up valuable storage space. I sorted through the pile and asked myself if I was ever going to make something with this green fabric, and not one of them inspired me. Most of them are a woven cotton and the perfect weight for making bags. I've been pre-washing and drying them in batches and cutting out the pieces assembly-line style, so I work on about 7 or 8 at a time. This way I don't have to keep changing the serger or sewing machine settings. I have lots of denim fabric that I might use for bags.
I didn't use a pattern to make these bags . . . I kind of made it up as I went along, using techniques I've used on other projects. Here's how I make mine:
First, I measured my "old" purchased bags: Height= 14"; Width=14"; Depth= 8". These are the finished dimensions.
The purchased bags were made from two squares of fabric connected with a boxing strip which would require sewing around corners. I decided that was too much work, so my bags are made from one continuous piece of fabric, then the corners are squared off to make the bags boxy.
To calculate the cutting width, I added the finished width + finished depth + (2 x 1/2" seam allowance) or 14 + 8 + 1 = 23" cutting width.
To calculate the cutting length, I added (2 x finished height) + depth + top hem or (2 x 14) + 8 + 2 = 38" cutting length.
I used a long ruler and rotary cutter to cut out the rectangles from the home dec fabric, saving the extra yardage to make handles later on.
This project began because I needed to clear out some space in my sewing room. I had a *lot* of home dec fabric remnants in 1-3 yard pieces that were taking up valuable storage space. I sorted through the pile and asked myself if I was ever going to make something with this green fabric, and not one of them inspired me. Most of them are a woven cotton and the perfect weight for making bags. I've been pre-washing and drying them in batches and cutting out the pieces assembly-line style, so I work on about 7 or 8 at a time. This way I don't have to keep changing the serger or sewing machine settings. I have lots of denim fabric that I might use for bags.
I didn't use a pattern to make these bags . . . I kind of made it up as I went along, using techniques I've used on other projects. Here's how I make mine:
First, I measured my "old" purchased bags: Height= 14"; Width=14"; Depth= 8". These are the finished dimensions.

The purchased bags were made from two squares of fabric connected with a boxing strip which would require sewing around corners. I decided that was too much work, so my bags are made from one continuous piece of fabric, then the corners are squared off to make the bags boxy.
To calculate the cutting width, I added the finished width + finished depth + (2 x 1/2" seam allowance) or 14 + 8 + 1 = 23" cutting width.
To calculate the cutting length, I added (2 x finished height) + depth + top hem or (2 x 14) + 8 + 2 = 38" cutting length.
I used a long ruler and rotary cutter to cut out the rectangles from the home dec fabric, saving the extra yardage to make handles later on.

To sew the bags, I used a serger and a 5-thread overlock stitch, which is a combination of a chain-stitched seam and a 3-thread overlock finish on the seam edges. Fold the rectangle in half and sew the two side seams. Press the seams and the folded edge at the bottom of the bag.

The bottom of the bag needs to be "boxed" to make it square. I start by opening out the bag and lining up the pressed bottom edge with one side seam to form a triangle shape. Using a ruler, I measure in 4" from the point of the triangle; arrange the fabric so that there are 4" on either side of the pressed edge.

Using a water- or air-soluble pen, I mark a line that should be 8" long. Pin this section and repeat on the other side seam. Serge along the marked line, and we now have a square-ish shaped bag.


Now it's time to make the handles. I wanted my handles 1" wide, so I cut strips of fabric 4" wide. The length is determined by whether you want long shoulder straps or short handles. I cut mine at about 16-18" long.
At the ironing board, fold the strips in half lengthwise and press. Open them up, then fold the long edges in toward the center and press again.


Then fold them back in half and press again.

It will be like a piece of bias tape, only bigger and cut on the straight grain. Using the sewing machine and a left-edge topstitch foot, I stitched along both long edges of each handle. The last step is to clean finish the raw edges; either zig-zag on the sewing machine or serge the edges.
Back to the bags - using a 3-thread overlock, stitch around the top of the bag to finish the edge. Measure 1-1/4" from the finished top edge and fold the fabric to the inside of the bag. Pin the hem in place all the way around and then press this with the iron.

Mark where you want your handles to be placed and pin them to the folded edge. Open up the hem section and securely sew the handles in place. Fold the hem back into place. Use a guide to mark a 1-1/8" hem. From the outside, stitch all the way around the top of the bag at 1-1/8" (this should stitch right through your serged edge), reinforcing the stitches as you sew over the handles. Stitch again through all layers about 1/8" from the top edge, reinforcing the stitches at the handles again. (I had photos of this step, but they disappeared . . . I'll add them later if I can re-create them)
I attached the handles slightly different with each set to find the best way to sew them. The common step for each was to sew an "X" inside a box, then reinforce the stitching across the handles when I topstitched the hem at the top of the bag.
Here are a couple of examples:
This is more like an X with a top and bottom added to it; this is the view from the inside of the bag. On later versions, I sewed the X with a left and right side added instead of the top and bottom -- because the top and bottom are reinforced when the hem is stitched in place.


The thread tension on my sewing machine was not working correctly when I made this one (which I've kept for my own use) so some of the beige thread stitches look bad. I'm including this image just to illustrate the construction process, not the actual stitching. :-)

Here's a view from the outside of the bag, illustrating the topstitching on the hem. It's a little hard to make out the beige stitching (I wanted the stitches to blend in).
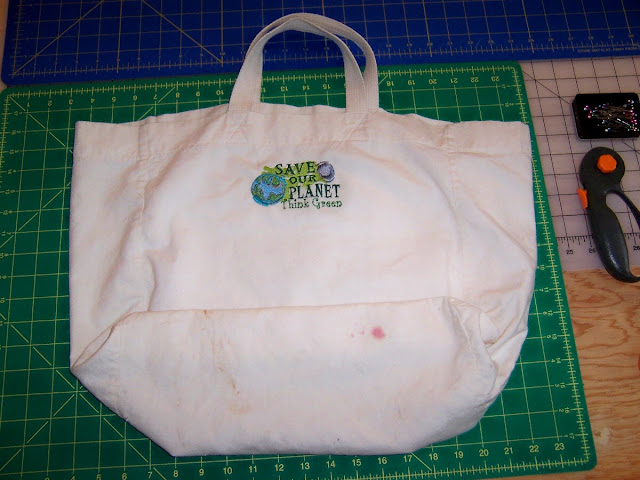
Here's a brand new shopping bag! I added embroidery and a pocket (with velcro closure) to some of them (but I'll write about those in another post).

These bags hold a *lot* of groceries!

See all photos from this tutorial in my Google photo album: How to Make Reusable Shopping Bags


Are these strong enough to hold several canned goods? We're thinking of doing a youth fund-raiser by making tons of reusable grocery bags and selling them.
ReplyDeleteTHANKS for your help.
What a great idea!
ReplyDeleteThe bags I have made are certainly large enough to hold lots of canned items -- I can fit 4 large 46-oz. cans/bottles of tomato juice and 5 large cans of soup (18-oz size) in one bag. That weighs just about 20 pounds - and is about my personal weight limit for carrying a bag to/from the car!
Because there is no seam on the bottom of the bag, I think they should be strong enough to hold that much weight over and over again, as long as the fabric is sturdy. The side seams don't appear to be getting too much stress.
My main concern would be about the handles - are they comfortable and will they stay attached. To be honest, the people to whom I've given the bags have not provided me any feedback on the handles yet. They feel secure to me.
I've sewn them a little bit differently with each set, but always attaching them by stitching an X inside a box and then reinforcing them when sewing the upper hem . . . I'll try to get a close-up photo posted soon.
Hope this helps! Good luck & Happy Sewing!
PS - there are lots of suggestions on the 'net for making reusable bags from all sorts of recycled materials . . . I have links to a couple of them in my "Green Links" at the bottom of my blog sidebar.