Kooky Little Monsters for Ryan
Ryan's 1st birthday is Sunday and there is a big party planned . . . so many family and friends are attending that his parents had to move the party to a larger venue. The party theme is "Curious George" since Ryan is such a CG fan.
I thought I might make something monkey-related for his birthday. I even bought several CG fabrics, but other than a quilt, I couldn't come up with something to make for a one-year-old. So I'm holding on to the fabric until inspiration strikes.
Instead, I went with my original idea of making a soft book. I bought these Kooky Monster embroidery designs from EmbroideryLibrary last autumn, sometime before Halloween. EmbroideryLibrary has really good instructions for making a fabric storybook. The pages are bound together using grommets/eyelets and lacing.
I think the designs are just too dense for a knit/stretchy fabric. I even tried a fusible permanent stabilizer and the results were the same.
So I had to change gears and find a different fabric for the soft book. I considered flannel and felt, but in the end I decided to use cotton home dec fabrics in coordinating colors. I used polymesh stabilizer as well as a lightweight tearaway and that did the trick. I pre-washed and dried all the fabrics before doing any embroidery.
I added each monster's name to their page, but I didn't make up a story . . . I decided to leave that up to the imagination of the reader. And I used two additional embroidery design files for the front and back covers.
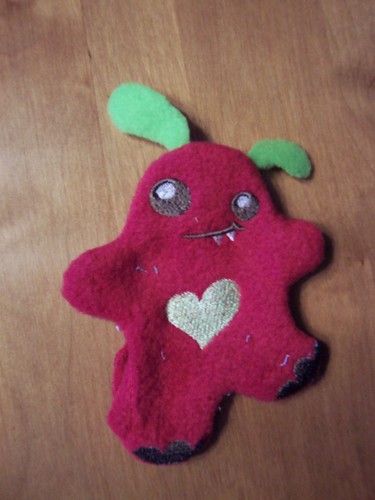
Once the book was finished, I started making the Kooky Monster Stuffies. These are soft toys made in-the-hoop (kind of like the minkee pals I have made in the past). I started out using the directions from EmbroideryLibrary for these, but then came up with my own method. For the first stuffie I tried to follow their instructions by using a dieline file to cut out the front and back of the monster. I had a problem though, because I decided to use fleece for the body of the monster which kept shifting while stitching the final seam and I ended up with puckers and folds and another reject. I finally decided I'd just have to use minkee for the bodies of the monsters, and it worked out much better.
The other step I changed was the "added on" horns, feet, ears, etc. Instead of a single layer of felt, I placed two layers of fleece, felt or minkee with wrong sides together on lightweight tearaway and stitched the dielines for each appendage. Then I trimmed them just outside the stitching for each piece. This gives them more body and they just look better to me.
For each stuffie, I stitched the monster's dieline onto a hooped piece of polymesh stabilizer. Then I cut a rectangle of minkee large enough to cover the dieline area, sprayed the back with a little temporary adhesive spray and then placed it in the hoop.
I thought I might make something monkey-related for his birthday. I even bought several CG fabrics, but other than a quilt, I couldn't come up with something to make for a one-year-old. So I'm holding on to the fabric until inspiration strikes.
Instead, I went with my original idea of making a soft book. I bought these Kooky Monster embroidery designs from EmbroideryLibrary last autumn, sometime before Halloween. EmbroideryLibrary has really good instructions for making a fabric storybook. The pages are bound together using grommets/eyelets and lacing.
At first I wanted to make the pages of the book from blue french terrycloth fabric I bought at JoAnn Fabrics last summer. Since these pages would probably end up in somebody's mouth, I thought the terrycloth would be nice and soft and washable. Well, the first monster I stitched on it didn't turn out too well. There were gaps in the stitching and puckers . . .

I think the designs are just too dense for a knit/stretchy fabric. I even tried a fusible permanent stabilizer and the results were the same.
So I had to change gears and find a different fabric for the soft book. I considered flannel and felt, but in the end I decided to use cotton home dec fabrics in coordinating colors. I used polymesh stabilizer as well as a lightweight tearaway and that did the trick. I pre-washed and dried all the fabrics before doing any embroidery.
I added each monster's name to their page, but I didn't make up a story . . . I decided to leave that up to the imagination of the reader. And I used two additional embroidery design files for the front and back covers.


Once the book was finished, I started making the Kooky Monster Stuffies. These are soft toys made in-the-hoop (kind of like the minkee pals I have made in the past). I started out using the directions from EmbroideryLibrary for these, but then came up with my own method. For the first stuffie I tried to follow their instructions by using a dieline file to cut out the front and back of the monster. I had a problem though, because I decided to use fleece for the body of the monster which kept shifting while stitching the final seam and I ended up with puckers and folds and another reject. I finally decided I'd just have to use minkee for the bodies of the monsters, and it worked out much better.
The other step I changed was the "added on" horns, feet, ears, etc. Instead of a single layer of felt, I placed two layers of fleece, felt or minkee with wrong sides together on lightweight tearaway and stitched the dielines for each appendage. Then I trimmed them just outside the stitching for each piece. This gives them more body and they just look better to me.
For each stuffie, I stitched the monster's dieline onto a hooped piece of polymesh stabilizer. Then I cut a rectangle of minkee large enough to cover the dieline area, sprayed the back with a little temporary adhesive spray and then placed it in the hoop.
The second step of the embroidery tacks down the minkee to the polymesh stabilizer. Then I placed a piece of Solvy, lightly sprayed with temporary adhesive, on top of the minkee fabric and continued to embroidery the monster's features (eyes, mouth, etc.).
Before the final seam, I removed the hoop from the machine, trimmed any jump stitches and removed the Solvy. I placed all the "add on" pieces -- ears, horns, spikes, whatever -- so that they would be stitched by the final seam.
Next I sprayed the front of another rectangle of minkee with temporary adhesive and placed it on top of the embroidery with the wrong side up, making sure all the extra pieces were in their proper positions. Then I put the hoop back in the machine and stitched the final step which sewed the front to the back.
When all the stitching was completed, I removed the fabric from the hoop, trimmed around all the edges with pinking shears, clipped any curves and then turned the monster right side out.


I stuffed these monsters with EcoCraft fiberfill. So far they have survived their first bath and blow dry intact and fluffy (I ran them through a gentle wash cycle and dried them in the dryer with my laundry).
To go with the soft book and stuffies, I have a sleeve saver bib with monster Eddie on it:

I sewed this sleeve saver last September, and did the embroidery in late November, right around the time I realized I'd have to scale down my Christmas gift-making, so I've been saving it for this "ensemble". I had some trouble with the embroidery puckering on this knit fabric (as mentioned above) so I don't plan on making any more of these at the moment.
The final piece to the gift puzzle was how to package this stuff without using traditional gift wrap. . . and at one point I had decided to use the Curious George fabrics to make a tote bag. But then I changed my mind, again. I had extra fabric left from the book cover and I just recently purchased Butterick See & Sew pattern #B4169 for really easy beach/tote bags. I thought the style of this bag would carry over the grommet finishing technique of the book. I added the embroidery -- I'm not worried about stranger-danger; I'm hoping Ryan can use this bag at day care to help store his toys and stuff (when it's not holding his kooky monster book and stuffies).


I stuffed these monsters with EcoCraft fiberfill. So far they have survived their first bath and blow dry intact and fluffy (I ran them through a gentle wash cycle and dried them in the dryer with my laundry).
To go with the soft book and stuffies, I have a sleeve saver bib with monster Eddie on it:
I sewed this sleeve saver last September, and did the embroidery in late November, right around the time I realized I'd have to scale down my Christmas gift-making, so I've been saving it for this "ensemble". I had some trouble with the embroidery puckering on this knit fabric (as mentioned above) so I don't plan on making any more of these at the moment.
The final piece to the gift puzzle was how to package this stuff without using traditional gift wrap. . . and at one point I had decided to use the Curious George fabrics to make a tote bag. But then I changed my mind, again. I had extra fabric left from the book cover and I just recently purchased Butterick See & Sew pattern #B4169 for really easy beach/tote bags. I thought the style of this bag would carry over the grommet finishing technique of the book. I added the embroidery -- I'm not worried about stranger-danger; I'm hoping Ryan can use this bag at day care to help store his toys and stuff (when it's not holding his kooky monster book and stuffies).
Happy Birthday Ryan!


Comments
Post a Comment