Finished! Simplicity 4273, Pants
I posted last week about Simplicity 4273, View E Pants after finishing my second muslin, just before cutting into the "good" fabric.
I am putting the "good" in quotation marks because although it is wearable fabric (compared to unbleached muslin), it was inexpensive and definitely not designer quality. But it serves my purpose of learning how to fit and sew pants and still be cost conscious.
The fabric color is called "potting soil" and it is a linen-look fabric I purchased at JoAnn ETC last year, when I first attempted to make pants for a class. It was supposed to be wrinkle-free, but I have found this is not the case.
Anyway, I cut the "good" fabric using the pattern alterations I came up with during my two muslin attempts - grading up two sizes from the waist to the hips, and taking out excess space in the back yoke waistband. I sewed everything together without incident -- no front to front seams or other silly mistakes. I even got the zipper and waistband in place without too many problems.
When I tried on the pants, they were too big and baggy everywhere but the waist. The waistband was perfect! And the center seam and crotch fit just right, too. In order to take in the seams for the legs, I had to rip out the zipper and waistband and re-sew the inner leg and outer leg seams, taking in 1/4" on each seam. I took my time re-stitching everything, then finished the raw edges of the seams to prevent the fabric from unraveling.
After I had taken in the seams, re-pressed and re-attached the zipper and waistband I tried them on again. Amazing -- they fit just right! At least, to my eye they do. I'm sure a more accomplished seamstress would see something to fix, but for this attempt, they are just about perfect.


I don't know why there are wrinkles in this photo -- they weren't there in the mirror. I think they are here because I used a tripod to to take my own photo and I was peeking over my shoulder waiting for the flash . . .
So why were they so big to begin with? I think perhaps because 1) my hip measurement is an odd number and I rounded up to the next larger (even) size, which wasn't really necessary because of the amount of ease already incorporated into the pattern and 2) the muslin fabric I used to test the pattern was somewhat stiff, so I thought I needed more room, even though I did not. But this was an easy adjustment to make and next time I know to either cut the pattern slightly slimmer or sew a wider seam allowance the first time.
There was one series of instructions I just could not figure out -- the zipper instructions called for the seam allowances to be different widths when applying the zipper. The result was that the front lapped the back by either 1/4" or 1/8" (I forget exactly). I couldn't decide how to make that happen with an invisible zipper -- it turned out all lumpy when I tried -- so I just set the zipper centered in the side seam (click here to see a photo of the zipper). I think it looks just fine. I haven't added a hook and eye yet, either.
When I started this project, I wanted to finish in time to wear the pants for Easter. Since I finished a week early, and we had a function to attend on Saturday evening (a surprise 50th birthday party for one of Rich's college friends), I decided to wear them for a test run. They were very comfortable all night.
The only complaint I have is that there are wrinkles from sitting . . . which is consistent with a linen-type fabric, but this was supposed to be wrinkle-free. Fortunately the wrinkles disappear immediately with light iron, so I will still be able to wear them for Easter. And if I use this type of fabric again, I may try applying fusible knit interfacing to the inside to help minimize the wrinkling. Then again, maybe I'll just spend more money for better quality fabric.
I was cleaning up my sewing room before hemming the new pants and decided to try on the reject pants from last year -- I had tried this pattern before taking the pattern alterations class and was disappointed that they did not fit, and at that time I didn't have any idea how to fix them. I had used black crepe-backed-satin (or satin-backed crepe) that had been purchased for some long forgotten dress . . . I was 8 or 9 pounds lighter then, too.
Anyway -- when I tried them on (just for comparison) it turns out they fit pretty well, except for the waist. Well now, I thought to myself, hadn't I just finished "fixing" the pattern pieces for the waist? All I'd have to do is take off the waistband and rip out the zipper and cut a new waist . . . wait a minute, didn't I just do that for the potting soil pants? Should be a piece of cake now!
So that's where I am now -- I removed the waistband and zipper and cut out new waistband pieces, facings, fused the interfacing and pinned the pieces together last night. Then I decided I should take a break, so I haven't re-sewn anything yet. Maybe this afternoon, the westies will take pity on me since it is a rainy day and decide to snooze all day instead of asking to play and go out . . .
And then I'll have TWO new pairs of pants!
I am putting the "good" in quotation marks because although it is wearable fabric (compared to unbleached muslin), it was inexpensive and definitely not designer quality. But it serves my purpose of learning how to fit and sew pants and still be cost conscious.
The fabric color is called "potting soil" and it is a linen-look fabric I purchased at JoAnn ETC last year, when I first attempted to make pants for a class. It was supposed to be wrinkle-free, but I have found this is not the case.
Anyway, I cut the "good" fabric using the pattern alterations I came up with during my two muslin attempts - grading up two sizes from the waist to the hips, and taking out excess space in the back yoke waistband. I sewed everything together without incident -- no front to front seams or other silly mistakes. I even got the zipper and waistband in place without too many problems.
When I tried on the pants, they were too big and baggy everywhere but the waist. The waistband was perfect! And the center seam and crotch fit just right, too. In order to take in the seams for the legs, I had to rip out the zipper and waistband and re-sew the inner leg and outer leg seams, taking in 1/4" on each seam. I took my time re-stitching everything, then finished the raw edges of the seams to prevent the fabric from unraveling.
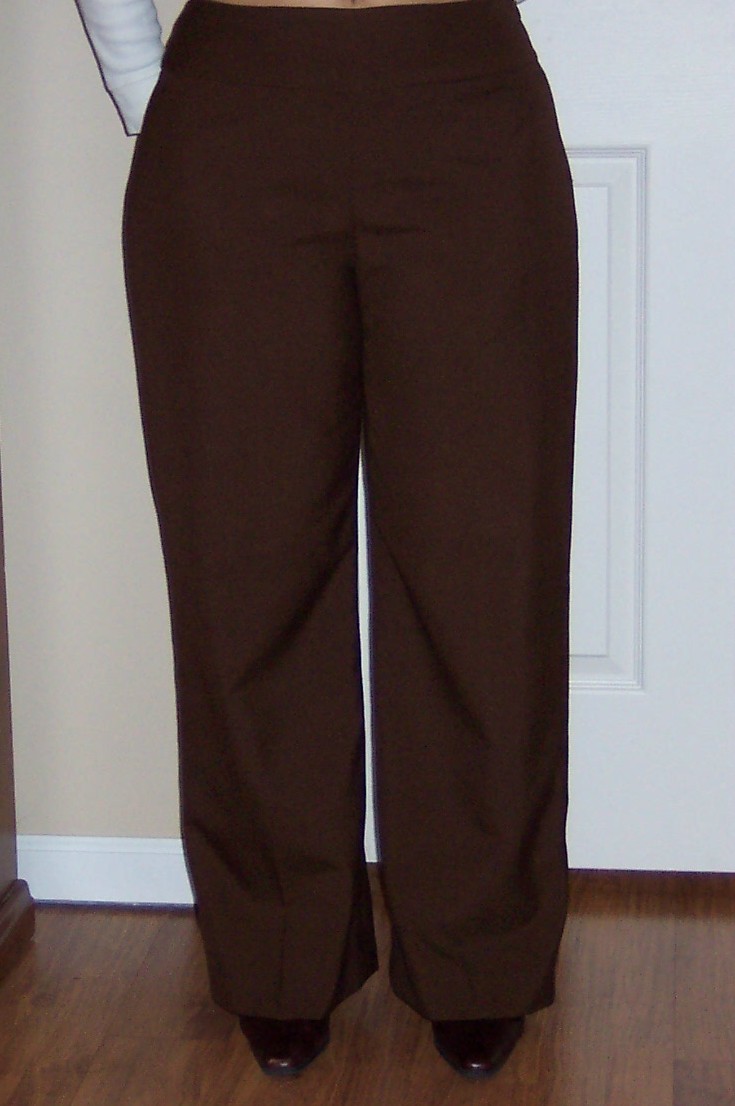
After I had taken in the seams, re-pressed and re-attached the zipper and waistband I tried them on again. Amazing -- they fit just right! At least, to my eye they do. I'm sure a more accomplished seamstress would see something to fix, but for this attempt, they are just about perfect.
front:
back:
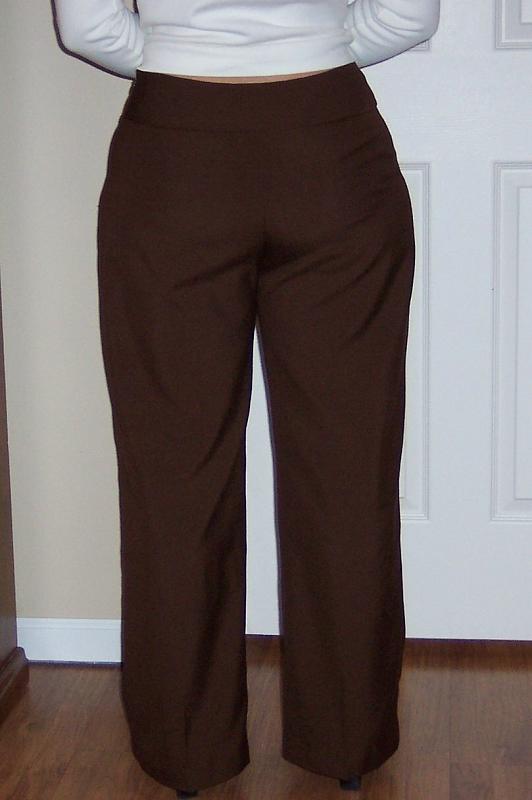
I don't know why there are wrinkles in this photo -- they weren't there in the mirror. I think they are here because I used a tripod to to take my own photo and I was peeking over my shoulder waiting for the flash . . .
So why were they so big to begin with? I think perhaps because 1) my hip measurement is an odd number and I rounded up to the next larger (even) size, which wasn't really necessary because of the amount of ease already incorporated into the pattern and 2) the muslin fabric I used to test the pattern was somewhat stiff, so I thought I needed more room, even though I did not. But this was an easy adjustment to make and next time I know to either cut the pattern slightly slimmer or sew a wider seam allowance the first time.
There was one series of instructions I just could not figure out -- the zipper instructions called for the seam allowances to be different widths when applying the zipper. The result was that the front lapped the back by either 1/4" or 1/8" (I forget exactly). I couldn't decide how to make that happen with an invisible zipper -- it turned out all lumpy when I tried -- so I just set the zipper centered in the side seam (click here to see a photo of the zipper). I think it looks just fine. I haven't added a hook and eye yet, either.
When I started this project, I wanted to finish in time to wear the pants for Easter. Since I finished a week early, and we had a function to attend on Saturday evening (a surprise 50th birthday party for one of Rich's college friends), I decided to wear them for a test run. They were very comfortable all night.
The only complaint I have is that there are wrinkles from sitting . . . which is consistent with a linen-type fabric, but this was supposed to be wrinkle-free. Fortunately the wrinkles disappear immediately with light iron, so I will still be able to wear them for Easter. And if I use this type of fabric again, I may try applying fusible knit interfacing to the inside to help minimize the wrinkling. Then again, maybe I'll just spend more money for better quality fabric.
I was cleaning up my sewing room before hemming the new pants and decided to try on the reject pants from last year -- I had tried this pattern before taking the pattern alterations class and was disappointed that they did not fit, and at that time I didn't have any idea how to fix them. I had used black crepe-backed-satin (or satin-backed crepe) that had been purchased for some long forgotten dress . . . I was 8 or 9 pounds lighter then, too.
Anyway -- when I tried them on (just for comparison) it turns out they fit pretty well, except for the waist. Well now, I thought to myself, hadn't I just finished "fixing" the pattern pieces for the waist? All I'd have to do is take off the waistband and rip out the zipper and cut a new waist . . . wait a minute, didn't I just do that for the potting soil pants? Should be a piece of cake now!
So that's where I am now -- I removed the waistband and zipper and cut out new waistband pieces, facings, fused the interfacing and pinned the pieces together last night. Then I decided I should take a break, so I haven't re-sewn anything yet. Maybe this afternoon, the westies will take pity on me since it is a rainy day and decide to snooze all day instead of asking to play and go out . . .
And then I'll have TWO new pairs of pants!


The pants look great and thanks for the review. I am considering the pants for my next project.
ReplyDelete