My First Country Fair
Background:
I opened my SewAmazin shops on ArtFire and Etsy in 2011 and have sold my fabric creations primarily online. This past April, a friend and I planned to share a booth with our local quilt shop at a spring street fair. We stitched and created for weeks, building up an inventory for the fair, but a few days before the event, the weather forecast predicted heavy rain and thunderstorms. In the wee hours of the morning, it was canceled and not re-scheduled.
I opened my SewAmazin shops on ArtFire and Etsy in 2011 and have sold my fabric creations primarily online. This past April, a friend and I planned to share a booth with our local quilt shop at a spring street fair. We stitched and created for weeks, building up an inventory for the fair, but a few days before the event, the weather forecast predicted heavy rain and thunderstorms. In the wee hours of the morning, it was canceled and not re-scheduled.
We were disappointed, but determined to try again. We decided to sign up for the Adorno Fathers Fall Country Fair in October, partly because it had a rain date built right into the schedule. The week before the date of the fair, the weather forecast was increasingly dismal, but we hoped for the best. It was beginning to feel like deja vu all over again...
The evening before the scheduled date, the event was postponed one week. At least we didn't have to spend the night worrying about whether or not to pack everything up! And that extra week really did come in handy for me to finish up a few additional pieces for my table and displays.
The Big Day:
The morning of the fair was chilly and misting slightly. My friend Kris (one of our Material Girls) arrived around 6am to load her truck with all our tables, tent and other 'hardware'. We loaded up my car as well and Rich followed us over to Ramsey. One nice feature about this fair is that the spaces are 20 feet square, so you can park your vehicle right behind, making unloading (and packing up) a little easier.
We just about finished setting everything up when the fair opened at 10am - thank goodness we had done a practice run a few weeks earlier to make sure everything worked and fit. Our tent is 10x10, so we had a little extra room on either side. Because it was windy (and a little damp) we put up the fabric 'walls' on each side for protection.
Here's a look at our tables. The left table has my insulated bottle carriers, some new owl zipper cases, and my rotating pegboard display with just about all my other non-petwear pieces. The table on the right has Kris's pins, pendants, and charms, plus a Halloween tree with some of my felt pumpkin and ghost candy holders.
The photos below show the other side of our set-up.
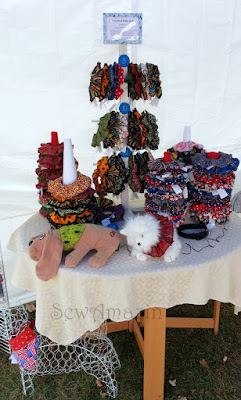 This is my scrunchie neck ruffle display. The wooden rack has three dowels going through it and I embroidered numbers on felt circles to indicate neck sizes. They're attached to the wood with temporary adhesive poster tabs. The ruffles didn't all fit on the rack, so I also used styrofoam cones wrapped in craft felt for my other scrunchies, sorted by holiday.
My 3 models were very popular as well! the wire terrier form is modeling one of the patriotic over-the-collar bandanas - it's actually a topiary that I could never bring myself to put outside in the garden.
The stuffed Westie is modeling a red plaid scrunchie neck ruffle and next to it is an original Pound Puppy (which belonged to my youngest brother), wearing a creepy spider bandana-style collar slipcover.
You can almost see the banner I made along the left of the photo - it's displayed using a garden flag stake.
Here's a photo of the banner while it was still in-progress. It's slightly larger than a typical garden flag, made of blue sport nylon fabric. The embroidery is on both sides
Kris made a bunch of her mixed media tags and charms to coordinate with my Puppy Dog, Kitty Cat, and Owl cases. They can be used as zipper pulls, pendants on ribbon necklaces, charms attached to chain necklaces and bracelets, even as fobs for USB sticks.
In the weeks leading up to the fair, I decided I needed a few things for my displays, and since I'm selling handmade pieces, I thought it was important to make, rather than buy them.
One of the things I needed was some sort of a frame to hold price and description signs for my pet neckwear displays.
The result was this fabric frame, using techniques similar to those for the Fabric Luggage Tags I made earlier this year.
Two frames were attached to my bandana displays using badge clips; the third frame is attached to my scrunchie ruffle display rack using temporary adhesive hook and loop tabs.
The result was this fabric frame, using techniques similar to those for the Fabric Luggage Tags I made earlier this year.
Two frames were attached to my bandana displays using badge clips; the third frame is attached to my scrunchie ruffle display rack using temporary adhesive hook and loop tabs.
I also wanted an apron with pockets where I could keep my phone, wallet, money, order book and anything else I might need for the fair.
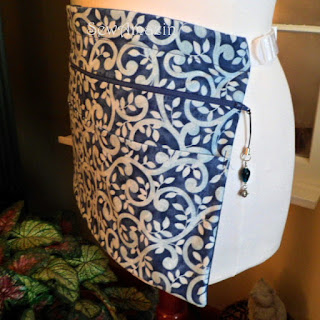
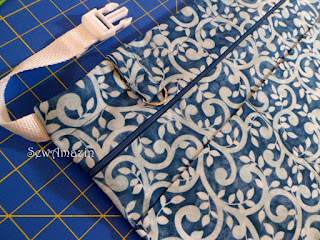
It had to be blue and big enough to hold all my stuff. After looking at a few examples online, I came up with this design. It's kind of a hybrid of an apron and fanny pack, lol!
It had to be blue and big enough to hold all my stuff. After looking at a few examples online, I came up with this design. It's kind of a hybrid of an apron and fanny pack, lol!
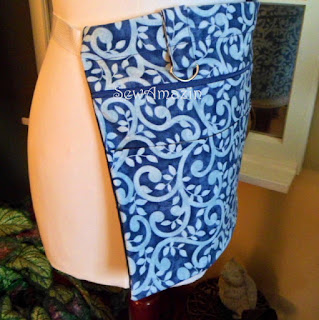
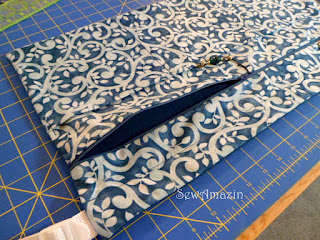
The body of the apron is really a big zippered pouch, where I could keep my valuable items like my wallet and credit card swiper.
Layered over the front is a row of pockets, divided into 3 sections to hold my sales order book, my phone in its padded case, plus business cards and coupons.
The waistband is made of white nylon webbing with white buckle clips; it's also adjustable so I can tighten or loosen it around my waist as needed. And I can put it on or take it off easily without have to fuss with ties behind my back.
There's also a tab with a d-ring for my keys (or anything else).
There's also a tab with a d-ring for my keys (or anything else).
**********
It was a very long day! The sun finally broke through the clouds around 1 pm and warmed us up. Friends and family stopped by to visit us too, which was great. I tried to post photos and updates to my Facebook page when I had a few moments and my fingers were warm enough to tap and type. At the end of the day, we packed everything up and were home again around 6:30pm.
I gave out a bunch of my business cards and coupons for my ArtFire shop, and when I got home I had several orders waiting from people I'd met earlier in the day.
We had a good time at the fair, even though we didn't sell as much as we had hoped. The attendance may have been lower because of the cool weather and schedule conflicts on the revised date. At least we covered our sign-up fee and learned a lot!
We're planning to team up again for a local Christmas Craft Fair & Breakfast with Santa on December 1. It's a much smaller venue and I'm trying to fit all my stuff on a single table, so I may need to get creative with my display. Wish us luck!
edited:
Nov-16-2018 Replace SewAmazin Flickr photos, uploaded to Blogger; edit old links
edited:
Nov-16-2018 Replace SewAmazin Flickr photos, uploaded to Blogger; edit old links



Comments
Post a Comment