Window Valances - Finished at last!
In November/December of 2009, we renovated our kitchen and powder room; the following summer, I painted the powder room (shared on this blog in July 2010), and then painted the kitchen in September.
The window treatments for both rooms have been waiting for me ever since... and finally they are finished! It feels good to cross them off the UFO list and add them to the Finished Projects 2012 page. Neither one was particularly difficult or time-consuming, they just kept getting pushed down on the priority list. And I almost passed on them again during my recent 'staycation', because I was enjoying working on the Bahama Breeze Quilt so much.
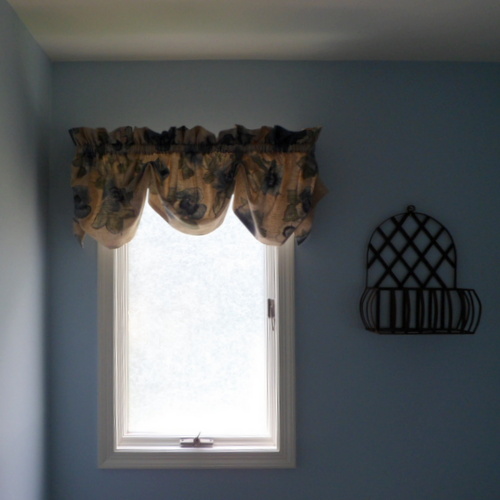 I worked on the powder room valance first. The fabric and lining for this valance are from my remnant stash, and I had already decided to copy the old valance style so I could re-use the rod and hardware (and save some $$ too).
The window does not have a shade; instead I applied a film to the glass that provides privacy and some light filtration. But it does make it a little difficult to photograph well.
I believe this style is called an 'Austrian' valance. It is based on a simple lined valance with a rod pocket and header, and horizontal pleats are added to make the poofy sections. I examined the old valance front and back to measure and replicate the pleating.
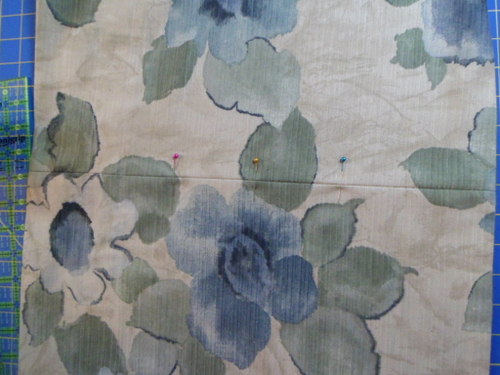
Here you can see how I marked each of the horizontal pleats with pins (the top of the valance is on the left of the photo). The pins are spaced about 3 inches apart.
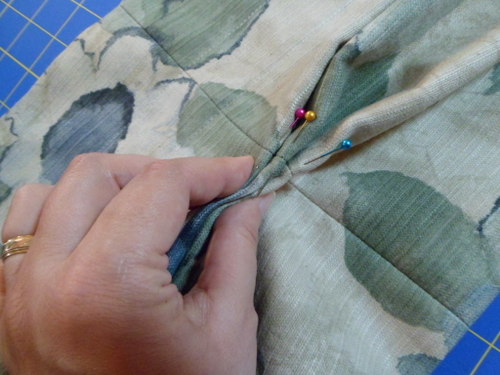
I folded the fabric so that the pins met in the front fold and pinched them together to stitch through all the layers.
The stitching is about 1/2 inch long and holds the pinched pleat together. I made 4 of these pleats, spaced at about 22 inches apart.
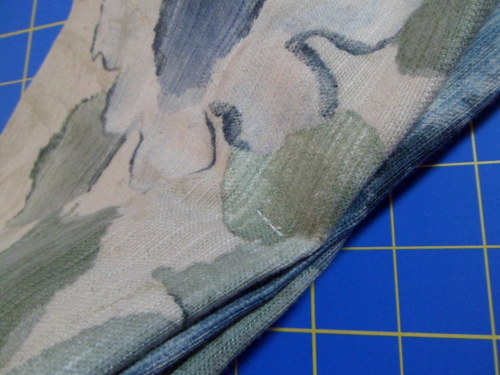
In the finished photo, the center poof looks a little lower than the others; I've been adjusting them every so often so that they look more even now. The fabric on the old valance was stiffer and held the pleats easily. My new valance fabric is softer and didn't hold the ironed in pleats very well.
I have a feeling that the center section is shorter than the others, so I may go back and re-stitch the pleats to even things out.
I have a feeling that the center section is shorter than the others, so I may go back and re-stitch the pleats to even things out.
Next up in the work room was the kitchen valance. I've changed my mind several times about the style for this one, but finally decided to make a valance with grommets.
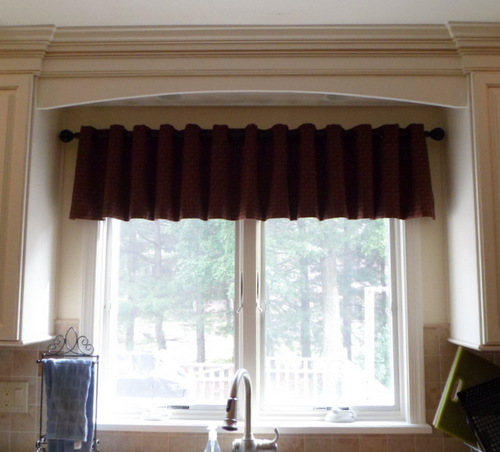
I bought the drapery rod last summer. The black color coordinates with the handles and knobs on our kitchen cabinets, and the ball finial is consistent with drapery rods used throughout our house.
The fabric was purchased for another project years ago - I don't remember exactly where I planned to use it originally, but I do remember changing my mind about it. Which is a good thing, because the color is perfect! The actual color is a dark wine-red with a hint of brown.
Once again, I started with a very simple, flat valance, twice the width of my window and about 14 inches total height, which includes a 3 inch header section. I used my serger on the raw edges on either end so that I didn't need to double fold the side hems, eliminating some extra bulk.
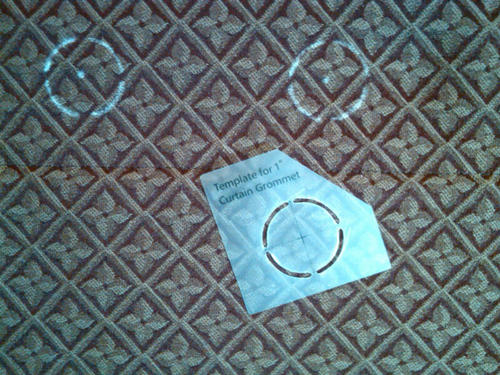
I used grommets from the home dec department of my local JoAnn Fabrics. The package contains 8 sets of grommets and a template to trace onto the fabric for perfect placement.
I used grommets from the home dec department of my local JoAnn Fabrics. The package contains 8 sets of grommets and a template to trace onto the fabric for perfect placement.
The most challenging part of this valance was determining the spacing for the grommets. I almost placed them 6-8 inches apart - after marking the intervals with pins, that didn't look right.
Frustrated, I googled 'grommet spacing for curtains' and found this excellent tutorial on grommet spacing from Rowley on YouTube which answered most of my questions.
Based on the distance of my rod to the wall/trim behind it, I needed to have about a 2 inch return; that meant spacing the grommets at 4 inch intervals from center to center. That spacing would require 26 grommets! Luckily, JoAnn's Coupon Commotion flyer arrived just in time for me to use my 50% coupons on 3 additional packages of grommets.
Before tracing the template, I placed pins at 4 inch intervals to double check my calculations and make any adjustments. I also needed to make sure the vertical seams where I pieced the fabric together fell on a back curve near the wall, not a front curve where everyone can see it.
The placement worked out so that the grommets on either end were about 2 inches from each side, and all the others fit the 4 inch spacing.
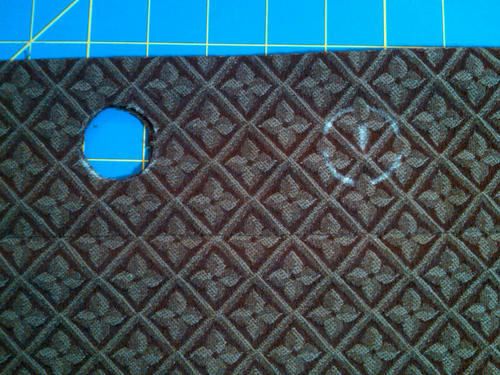
I used a clear ruler to mark the half way point of the 3 inch header at each pin, then aligned the template and traced with chalk.
The placement worked out so that the grommets on either end were about 2 inches from each side, and all the others fit the 4 inch spacing.
I used a clear ruler to mark the half way point of the 3 inch header at each pin, then aligned the template and traced with chalk.
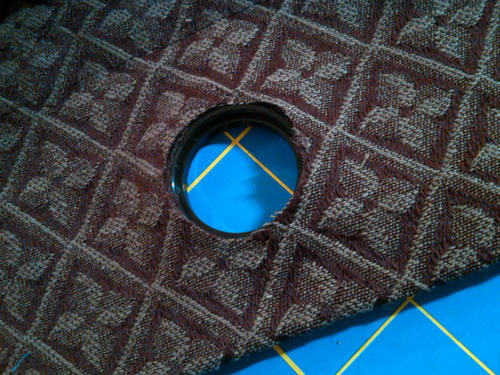
After cutting out the circle of fabric, the grommet is installed by placing the front part through the hole, then snapping the back in place.
Compared to other types of eyelets and grommets that require special tools and hammers - this was a piece of cake!
It probably would have been more technically correct to have used some sort of stabilizer in the header section for support, but since this is just a valance and doesn't weigh as much as a full length drapery panel, I'm not worried about it.
It probably would have been more technically correct to have used some sort of stabilizer in the header section for support, but since this is just a valance and doesn't weigh as much as a full length drapery panel, I'm not worried about it.
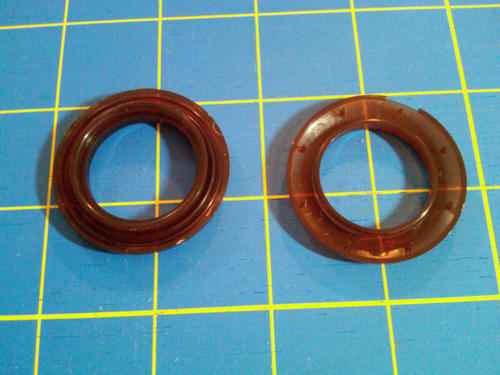
This shows one set of grommet pieces - the left is the front piece with raised center that pokes up through the fabric; the right shows the back piece with prongs that snaps in place.
These grommets are available in several colors and sizes. I really like this brown color - it looks like tortoise shell and goes perfectly with my fabric.

Here you can see the spacing of the first few grommets, with one installed, the second cut out and several others traced. I traced the template for about 5 grommets at a time, then cut and installed each one.
Installing all 26 grommets took me a couple of hours, about as long as the Mets' game against the Braves on Sunday afternoon.
The final step was to thread the valance onto the rod, alternating front and back grommets and making sure both side ends faced the back. I had to do this twice - the first time, I threaded the valance onto the rod backwards - and didn't even notice until after the valance and rod were hanging for about half an hour, LOL!
The final step was to thread the valance onto the rod, alternating front and back grommets and making sure both side ends faced the back. I had to do this twice - the first time, I threaded the valance onto the rod backwards - and didn't even notice until after the valance and rod were hanging for about half an hour, LOL!

I'm very pleased with the finished valance! Every time I enter the kitchen I can't help admiring it. I'm considering whether or not we need a matching valance to go over the sliding doors that lead out to the deck ...
Each window valance took me about one day of work - about 2 days altogether. And two years of procrastination.
I never did get around to sharing photos while painting the kitchen here on the blog. In-process painting photos are in my Kitchen/Powder Room Renovation set on Flickr. One of these days, I will have to take some 'after' photos of the entire kitchen ... I'll put that on my to do list.
*****
I spent the majority of my 2 week 'staycation' working on the blocks for my Bahama Breeze Quilt - I'm still plugging away at them as time permits. I'll share an update on that project after all the blocks are finished and I'm ready to begin the next step. I'm pretty sure I'll be quilting a block at a time.
edited:
Nov-15-2018 Remove links to SewAmazin Flickr sets


Comments
Post a Comment