Saturday, March 28, 2009

Re-Purposed?

I spotted this Damascus antique sewing machine turned into a lamp while shopping at the Scranberry Coop last week:

Antique Sewing Machine Lamp Antique Sewing Machine LampAlign Center

My first reaction was How Cool is This and Wouldn't it be Perfect for my Sewing Room?

Then I thought, but what if it was still functional and someone turned it into a lamp just because it was old?

In the end, it did not come home with me; I don't really have the right space for it. But I'm sure someone will find it and treasure it.


Wednesday, March 18, 2009

Finished: Best Friend and Four Leaf Clover Banner

Well, it's a day later than planned, but it's finally finished.

St. Patrick's Day Banner
My previous post about this project has all the machine embroidery information and links.

The embroidery phase of this project went really smoothly; choosing the border fabrics and piecing them together progressed well also. I used EcoCraft Eco-friendly (100% PLA) batting for this project because I had a large enough piece left in my stash. I ran into trouble when I tried stitching in the ditch quilting and forgot to use the dual feed foot, and ended up picking out several rows of stitching that were all puckered.

Later I had problems with the binding. I don't know what I was thinking, but it ended up being too narrow the first time I tried to apply it and I decided to trim the edges of the banner to try and make it work. I should have just ripped it out and started over. What a mess -- I decided to trim about 1/8" from each side to straighten it out again and made a quick shopping trip to find a new binding fabric.

I finally got a binding on the piece and after taking the first set of photos decided I should have done more quilting. I know, the quilting should be done before binding, but I just had to do it. Look at the before photo (below left), it just doesn't look finished compared to the after photo (below right), does it?

St. Patrick's Day Banner St. Patrick's Day Banner

First I attempted channel quilting around the shamrock shape on the top block. I know, it's not quite perfect, but isn't it more interesting? (oops -- that should have said echo quilting, not channel)

(left: after quilting; right: before quilting)
St. Patrick's Day Banner St. Patrick's Day Banner

Last, some wavy lines to frame the sampler block:
(left: after quilting; right: before quilting)
St. Patrick's Day Banner St. Patrick's Day Banner

I used a Sulky 30wt blendable green variegated cotton thread for these sections.

Here's a close-up of the center block, a white terrier dog with a shamrock on it's collar:
St. Patrick's Day Banner
The decorative stitches were sewn through all layers in 40ct rayon thread; I thought this stitch resembled four-leaf clovers. The green shamrock buttons were added after finishing the binding.

I still think the binding is a little bit wonky in sections, but overall I'm pleased with the finished project. I think the color and fabric selections go together well. And now that it's finished, I can see how I could have added other design features to help the sections flow together better.

I definitely need A LOT more practice quilting.


Stitch N' Pitch goes to Cooperstown


-------------------------------------------------------------------
FOR IMMEDIATE RELEASE - March 6, 2009

STITCH ‘N PITCH Comes to Cooperstown

-Hall of Fame to host celebration of two timeless traditions, baseball and needlearts-

(COOPERSTOWN, NY) – As part of Youth Baseball Week, the National Baseball Hall of Fame and Museum will give visitors the chance to create their own needlework projects by hosting STITCH ‘N PITCH, a program of the National Needlearts Association, on Sunday, April 19, starting at 10 a.m. and running throughout the day. Admission to the Stitch ’N Pitch program is open to all Museum visitors with a paid admission, as the event will consist of an interactive session where visitors can use their hands to stitch a baseball-themed needlepoint or crochet project which can be brought home.

Patterns featuring baseball bats and wristbands will be available to fans, and more intricate designs will also be on display.

STITCH 'N PITCH, a program of The National Needlearts Association, has taken baseball by storm over the past few years. Numerous major league and countless minor league organizations have hosted STITCH 'N PITCH events over the past three summers. More information on the organization is available at www.StitchNPitch.com

To read the rest of this press release, visit the National Baseball Hall of Fame website.

We attended the Stitch N' Pitch event at Shea last September and were disappointed to find the emphasis was almost exclusively on knitting and crochet. I would have liked to see more variety of needlework encouraged since there are many, many other forms of needlearts, but these are portable and easy to work on during a game.


Sunday, March 15, 2009

In Progress: Best Friend and Four Leaf Clover Banner

Last month, for Valentine's Day I made this quickie Thankful Heart banner. This month, for St. Patrick's Day, I planned a companion piece based on another Embroidery Library sampler verse design, Best Friend and Four Leaf Clover.

I started out embroidering the Best Friend verse on some linen-type fabric. Then I remembered I had another design, a Celtic Shamrock appliqué that would look nice with it. And one last thing needed was a Westie - okay, technically they are Scottish, not Irish, but I wanted one on this banner. I used this freebie dog design, downloaded from EmbroideryDesigns.com and changed the colors a little, embroidered on some green fabric. It's not a real Westie design, but it is a floppy eared terrier, sort of like Penny.

This is what I've come up with so far:
St. Patrick's Day Banner

I made a last minute decision while embroidering to change the dog's collar color from red to green, but forgot that the same color thread was used for the tongue. So my dog has a green tongue. It could happen.

I've cut some strips of coordinating green fabrics to make a few "scrappy" borders between the embroidered pieces. This should be finished in time for St. Patrick's Day.

Annual road trip to the Quiltfest of NJ

Just over a week ago, three of us "Material Girls/DKnJ" made our annual road trip (see 2007 and 2008) to the Quiltfest of NJ, in Somerset, NJ. This year, the weather was sunny all day and we didn't have to drive through rain or snow.

On the drive down, we wondered how well attended this year's show would be on a Friday, considering the current state of the economy. We arrived a little later than usual and found that the main parking lot was full, a very good sign, even if we did have to walk a bit further than usual. Once inside the Garden State Exhibit Center, we discovered it wasn't jam-packed crowded, but there were plenty of quilting enthusiasts shopping and viewing the exhibits.

As is our custom, we all started out in the same direction, but quickly split up to visit the vendors at our own pace, with a plan to meet for lunch. It took me a little bit of time to get into a shopping mode - I still don't really need anything new, and with Rich in between jobs I'm trying to be careful about buying too much stash just for the sake of stash.

I managed to find a few things for the Westie fabric collection I couldn't pass up.

From The Quilted Cat, these are one yard pieces:
From Westie Fabric Collection
selvage info:
left: Santa Claws & Paws by Deb Strain for moda C modafabrics.com Pattern #.19077;
right: Robert Kaufman Dogs Spotted Everywhere Screen Print D# 6476 www.robertkaufman.com


From WebFabrics, these are two white on white textures, hopefully for making Westies in quilts.

selvage info:
Dimples by Gail Kessler for Andover Fabrics C Patt 1867 www.andoverfabrics.com

And this quilt pattern from Critter Pattern Works:

Small Dogs quilt designs for traditional machine appliqué (not digitized for machine embroidery); I only plan to make the Westie and maybe the Schnauzer someday.

I've updated my list of Westie Quilt Pattern Links to include the pattern above, plus a few others.

One of the special exhibits at this year's Quiltfest was Linda Hibbert: One Woman Show and one section of the display caught my eye because of her AKC dog breed quilts - she had designed patterns for all the breeds and made quilts according to the group they belonged to. I took this (poor) photo of the Westie block with the camera on my phone:

A better image of the Terrier and six other group quilts (as well as individual breed designs) can be found at SilverLiningsOriginals.com Canine Corner page (scroll down the page). And yes, I've ordered the e-pattern for this head study design. I'm seeing it on a pillow to go with the new slipcovers . . .

Right across from the Terrier group quilt was the booth for Quilter's Obsession and right away the sample quilt for this Bahama Breeze pattern called to me:
Bought at the NJ Quiltfest

The batik fabrics are beautiful and fit perfectly into the color palette I used for the master bed and bath last summer. Remember these valances? And my original plan for the Sew Fun quilt? I never did get started on that quilt . . .

I didn't buy this right away, for several reasons. First, I already had that Sew Fun quilt planned, but never started; second, this pattern is for a throw quilt and I need a queen size; third, the pattern requires paper piecing, which I've never tried.

So I went to lunch to think about and talk it over with the other girls . . . and after lunch I decided to buy the kit. I still wasn't sure I'd try to increase the size to a queen. But after Rich saw the fabric and liked the pattern, we decided I'd buy a second fabric bundle so that I could make a queen size quilt. Wish me luck! I'm tentatively putting this on the project list to get started in April.

I picked up just a few other items at the Quiltfest -

Also from Quilter's Obsession, these fat quarter bundles, just because I like the colors. These may end up as a baby gift sometime in the next year:
Bought at the NJ Quiltfest

And because I want to use the full potential of my embroidery machine for quilting, I bought this Quilter's Paradise machine embroidery collection from Anita Goodesign from Above & Beyond Creative Sewing (one of the show's sponsors):
Bought at the NJ Quiltfest

And last, these pins from Meadow Gems, just because I like them:
Bought at the NJ Quiltfest

So I didn't do too bad, really. Almost everything I bought was with the intention of using it for a current or soon to be started project.

I just need to get started on a few of them.

Wednesday, March 11, 2009

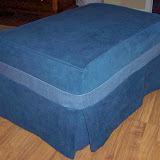
Slipcover Progress: Final Wrap-up and Links

Below is a summary of all my blog entries for this slipcover project, in chronological order:
All the project photos are in my Slipcovers Picasa photo album
Slipcovers

I've wanted to tackle this slipcover project for a number of years, but various obstacles or distractions always seemed to push it aside. In a way that was a good thing, because a lot of the other projects I've worked on in the interim helped me develop the sewing skills to make this slipcover the way I wanted it without compromising. Of course, my version was a lot more complicated than a basic slipcover and if I ever decide to make another, I will make a much simpler design.

From Slipcovers


For example, constructing the various bags, purses and totes I've made over the past few years helped me to visualize three dimensions when joining the inside corners of the slipcover where several seams intersect. Also, making cushion covers for other furniture helped me with making and attaching piping. More recently, making covers for the dog beds helped me with planning how to insert a zipper and using the original covers as patterns. These were steps I considered easy so I could focus on the more challenging aspects of fitting curves and corners and making kick pleats.

I still plan to cover the throw pillows sometime soon and I'd like to integrate some pops of red and maybe a Westie or two into the room. That will have to wait for now.

Some statistical odds and ends:
  • Fabric Used: Sofa: 22 yards Miss Kitty Denim (home dec fabric, 54" wide), and about 5 yards muslin (45" wide) for lining the kick pleat under- and overlays; Ottoman: about 1-1/2 yard fabric remnants
  • Piping: made 880 inches or about 24 yards for the sofa and cushions; about 120 inches for the ottoman
  • Zippers: made 4 @ 42 inches each = 168 inches or 4-2/3 yards of Make A Zipper
  • Hardware used: Designer SE with clear B foot, single welt cord foot, and narrow zipper foot; Huskylock 936 serger set to 3 thread overlock stitch with regular S foot and large piping foot for clean finished seams
  • Notions: T-pins, air and water erasable marking pens, chalk wheel, bedskirt/twist pins, button cover kit, rotary cutter and mat, extra long 120" measuring tape
  • Reference Book: Simplicity's Simply the Best Home Decorating Book

*****

Links: (I'll add to this list if I find other helpful resources)
  • Simplicity's Simply the Best Home Decorating Book - available from many vendors, this is a good basic how-to book, especially for beginners. The styles in the photos are a bit dated, but the instructions for measuring, constructing and installing basic home decor projects such as window treatments, bedskirts, pillows and slipcovers are easy to follow. Be sure to use your own imagination and don't be put off by the balloon valances and ruffled pillows in the photos!
  • Pam Damour - The Decorating Diva has a DVD Super Slipcovers that was somewhat helpful, after the fact. I didn't realize I had this in my stash until after I was finished with my project. I watched it just the other day and it reinforced some of the steps I had followed on my own. It's a good overall demo video for experienced sewists, but very new beginners would probably need more detailed information. Some steps, such as constructing welt cording or making the skirt, were described verbally but not actually demonstrated in detail.
  • Sew, Mama, Sew! Blog >> Sewing for the Home (September 2008) ~ Sewing a Slipcover - a step by step tutorial for a basic wing chair slipcover

Slipcover Progress: Finishing Touches

Wow, I can't believe it's been two weeks since my last entry. I finished the slipcovers earlier, but haven't been able to get back to blogging until now. Part of the reason for that is I am sharing my desktop computer with Rich until his new laptop arrives, and his job search activities are a higher priority than my blogging at the moment. Right now I am using an older back-up laptop that I use mainly for machine embroidery; I've fitted it out enough to access the internet on a limited basis, but the keyboard is squishy so please excuse any typos that slip through . . .

Anyway, last time I wrote about the slipcover, I was just about finished putting it all together, but still needed to do a few alterations and finishing touches.

First, I needed to re-stitch the back section around the shoulders to take out too much fullness. That fixed the gapping problems.

Next, I needed to finish the edges of the underlays for the "faux box pleats", which I have recently learned are more accurately called "kick pleats". I pinned the underlays in place on the sofa and marked the top edges, then serged them for a neat finished edge. Each corner of the sofa has one full underlay; the front center has a smaller underlay and the front left and right corners have smaller, angled underlays. After the raw edges were serged, I attached them to the sofa with twist pins (also known as bedskirt pins).

On a different slipcover, these could have been sewn onto the body of the cover; however, my cover doesn't have a horizontal seam for a skirt and I couldn't figure out how to sew them invisibly without adding a lot of bulkiness and sagging. The original upholstery is stapled to the frame of the sofa (see my previous blog post), so I am following that design, but am using twist pins instead of staples.


I had not serged the seams of the cushion covers yet, so that was my next assignment. I used a large piping foot to help guide the way and finished all the inside seams of the cushions.

left: before serging; right: after serging


I wanted to find some fancy twist pins to use on visible areas of the slipcover, but couldn't find any that I liked. But I did see some comments about upholstering the twist pins using button covers. So you know I had to try this out.

The least expensive pins were at Bed, Bath & Beyond, a dozen in a package for $2.99. I bought several packages for this project, but have made only 6 upholstered pins so far. The button cover kit I found was at JoAnn Fabrics, a Dritz kit for 1/2 inch covered buttons.


To make upholstered twist pins, I followed the basic instructions for making covered buttons, pushing the fabric and button top into the tool as directed on the package:


Instead of inserting the button back I pushed the head of the twist pin into the button cover:

The last part was a little tricky and I had to improvise and use a few different "tools" to help push the twist pin into the button cover evenly. After it was securely in place, I pushed the bottom of the white part of the tool to pop out the finished pin.

I found that trimming the fabric after it was pushed into the bottom of the tool removed some bulk and made it easier to push the head of the twist pin into place. On a few of the covers, a few loose threads of fabric poked out afterward, so I put a little bit of Fray Check on them, just in case.

The result: half a dozen covered twist pins!


The last finishing touch is to cover the throw pillows. I could use the same fabric as the slipcover, but how boring would that be?

In my stash I found this herringbone upholstery remnant, bought at the Ethan Allen warehouse sale a few years ago, and I think it coordinates well with the Miss Kitty Denim:

I'm pretty sure this fabric will stand up to the challenge of Westie naps, but I don't think I'll finish these throw pillows for a few more weeks, since I have a few other projects I'd like to get started first.

There's no rush, since we already have plenty of throw pillows.
Keli


Next post: My final wrap-up and some links for future reference
Related Posts Widget for Blogs by LinkWithin