Customizing a Freebie Sports Bag
I may have mentioned once or twice that we have tickets this year for the "Sunday Plan" -- all the Mets' Sunday home games. On August 12, they played the Marlins, and the giveaway that day was a sports bag. I *gotta* have my free stuff! Maybe I'll have to make a separate posting of all the freebies I've taken home this year . . . after the post-season.
Anyway -- I ended up with 4 of these sports bags: one each for me and Rich, and two from our guests that day, who for some reason didn't want a free bag. I can't understand why.
So, one bag is for me to take to the gym and I took one out to Neil & Debbie, our usual seatmates, who couldn't make it on sports bag day. Now there are two left; I'm still not sure who will receive them, but one may end up as a personalized birthday gift for someone.
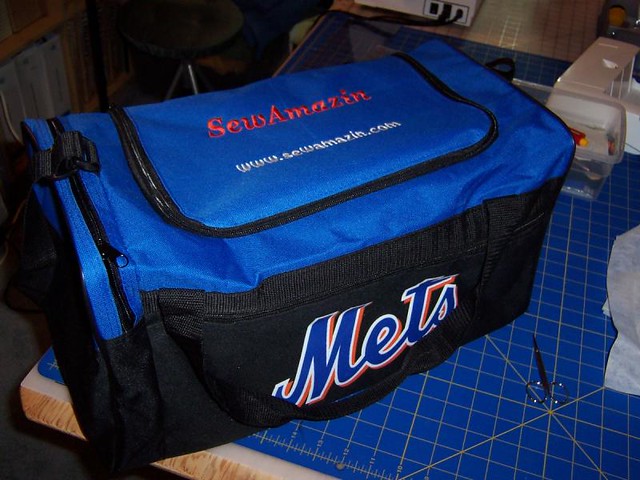
But, as soon as I took mine out of it's wrapping, the wheels began turning in my head -- how can I embroider this? What will I stitch on it? I decided to embroider my "SewAmazin" nickname and blog address on the flap. Here's how I did it:
 First I had to do some sample stitch outs on a remnant of outdoor canvas. (This is why it's good to be a remnant junkie!) It was the closest match in texture and color to the material the bag is made of.
Using the Quickfont feature in my 4D Embroidery software, I created a couple of fonts to test out -- Georgia Italic Bold (to match my blog title) and Banner (which matches my cards). I don't really like the 'z' in the Banner font, so decided Georgia was the one to use.
I used a tear-away stabilizer and hooped the canvas and stabilizer together. On the first line, I used the "fix" function to baste the canvas to the stabilizer -- big mistake, because the holes do not heal themselves later (duh!). I also used a size 90 embroidery needle on this sample, but I didn't like the way "holes" around the stitches looked, so decided to use a 75 embroidery needle on the actual sports bag.
When I was ready to stitch on the bag, I used some temporary spray adhesive to somewhat adhere the tear-away stabilizer to the back of the top flap. I used a chalk pencil to mark my vertical center and two horizontal lines to align my stitching. Then I hooped the bag flap in a 5x7 hoop, keeping the bulk of the bag to the left side. This took a bit of time . . . it was quite bulky, so I very carefully inserted my hoop onto the embroidery arm, making sure that no part of the bag would get caught up either in the stitching or on the embroidery arm.
So, one bag is for me to take to the gym and I took one out to Neil & Debbie, our usual seatmates, who couldn't make it on sports bag day. Now there are two left; I'm still not sure who will receive them, but one may end up as a personalized birthday gift for someone.
But, as soon as I took mine out of it's wrapping, the wheels began turning in my head -- how can I embroider this? What will I stitch on it? I decided to embroider my "SewAmazin" nickname and blog address on the flap. Here's how I did it:
 First I had to do some sample stitch outs on a remnant of outdoor canvas. (This is why it's good to be a remnant junkie!) It was the closest match in texture and color to the material the bag is made of.
Using the Quickfont feature in my 4D Embroidery software, I created a couple of fonts to test out -- Georgia Italic Bold (to match my blog title) and Banner (which matches my cards). I don't really like the 'z' in the Banner font, so decided Georgia was the one to use.
I used a tear-away stabilizer and hooped the canvas and stabilizer together. On the first line, I used the "fix" function to baste the canvas to the stabilizer -- big mistake, because the holes do not heal themselves later (duh!). I also used a size 90 embroidery needle on this sample, but I didn't like the way "holes" around the stitches looked, so decided to use a 75 embroidery needle on the actual sports bag.
When I was ready to stitch on the bag, I used some temporary spray adhesive to somewhat adhere the tear-away stabilizer to the back of the top flap. I used a chalk pencil to mark my vertical center and two horizontal lines to align my stitching. Then I hooped the bag flap in a 5x7 hoop, keeping the bulk of the bag to the left side. This took a bit of time . . . it was quite bulky, so I very carefully inserted my hoop onto the embroidery arm, making sure that no part of the bag would get caught up either in the stitching or on the embroidery arm.
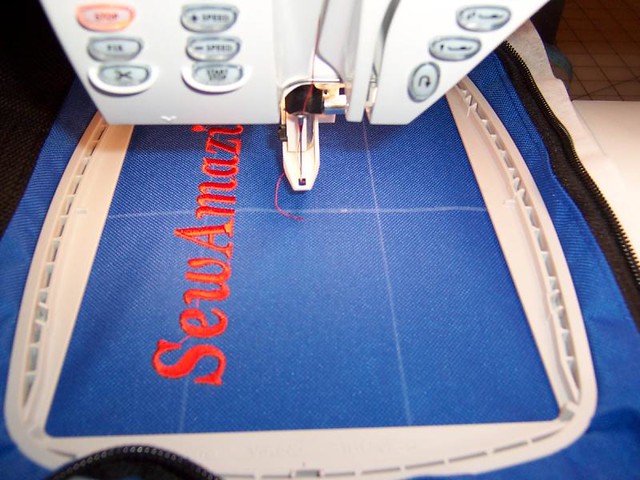
I stitched one line at a time on the next to slowest setting.
You can see how I hooped the flap below:
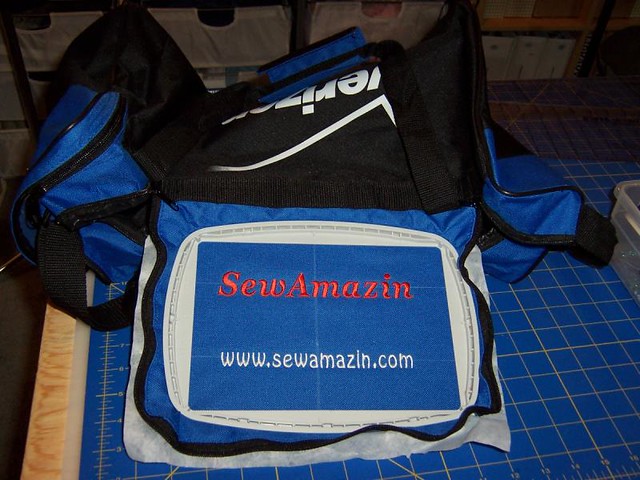
There were some indentations from the hoop on the flap afterwards; I used a very cool iron and a light touch to smooth them out. A damp sponge helped remove the chalk lines.
I'd like to add more embroidery to the ends of this bag, but I'm waiting to see what the post-season brings. I should be able to hoop it with a 100x100 hoop and manipulate the bag just enough to get it on the machine . . .I'd also like to make the shoulder strap detachable. Right now it is adjustable, but I'd like to be able to remove it. I need to find a source for the hardware; the strapping is 1-1/4" wide and all the clips and d-rings I can purchase locally are only 1" wide.


Comments
Post a Comment